Self hosting with NAT and port forwarding and dynamic DNS is kinda fragile. I’ve been using a very cheap cloud-hosted nginx VPS to forward traffic to my self-hosted servers and it works nicely.
But tonight I set up a ssh tunnel that punches out from my server skipping the NAT, forwarding, and DNS stuff entirely. It’ll dial home from anywhere there’s network so I could even take my server to the park and it should work over 5g.
I just think that’s neat.
I’ve tried to explain a bit of my thinking, and a loose guide for how to set this up yourself. These instructions are for someone who’s vaguely familiar with nginx and ssh.
- How it usually works
- A more resilient port forwarding over ssh
- How to set up an nginx proxy to forward to your self hosted server
- How to forward ports to your self-hosted server over SSH
- How to set up a persistent SSH tunnel/port forward with systemd
- My observations using SSH tunneling
How it usually works
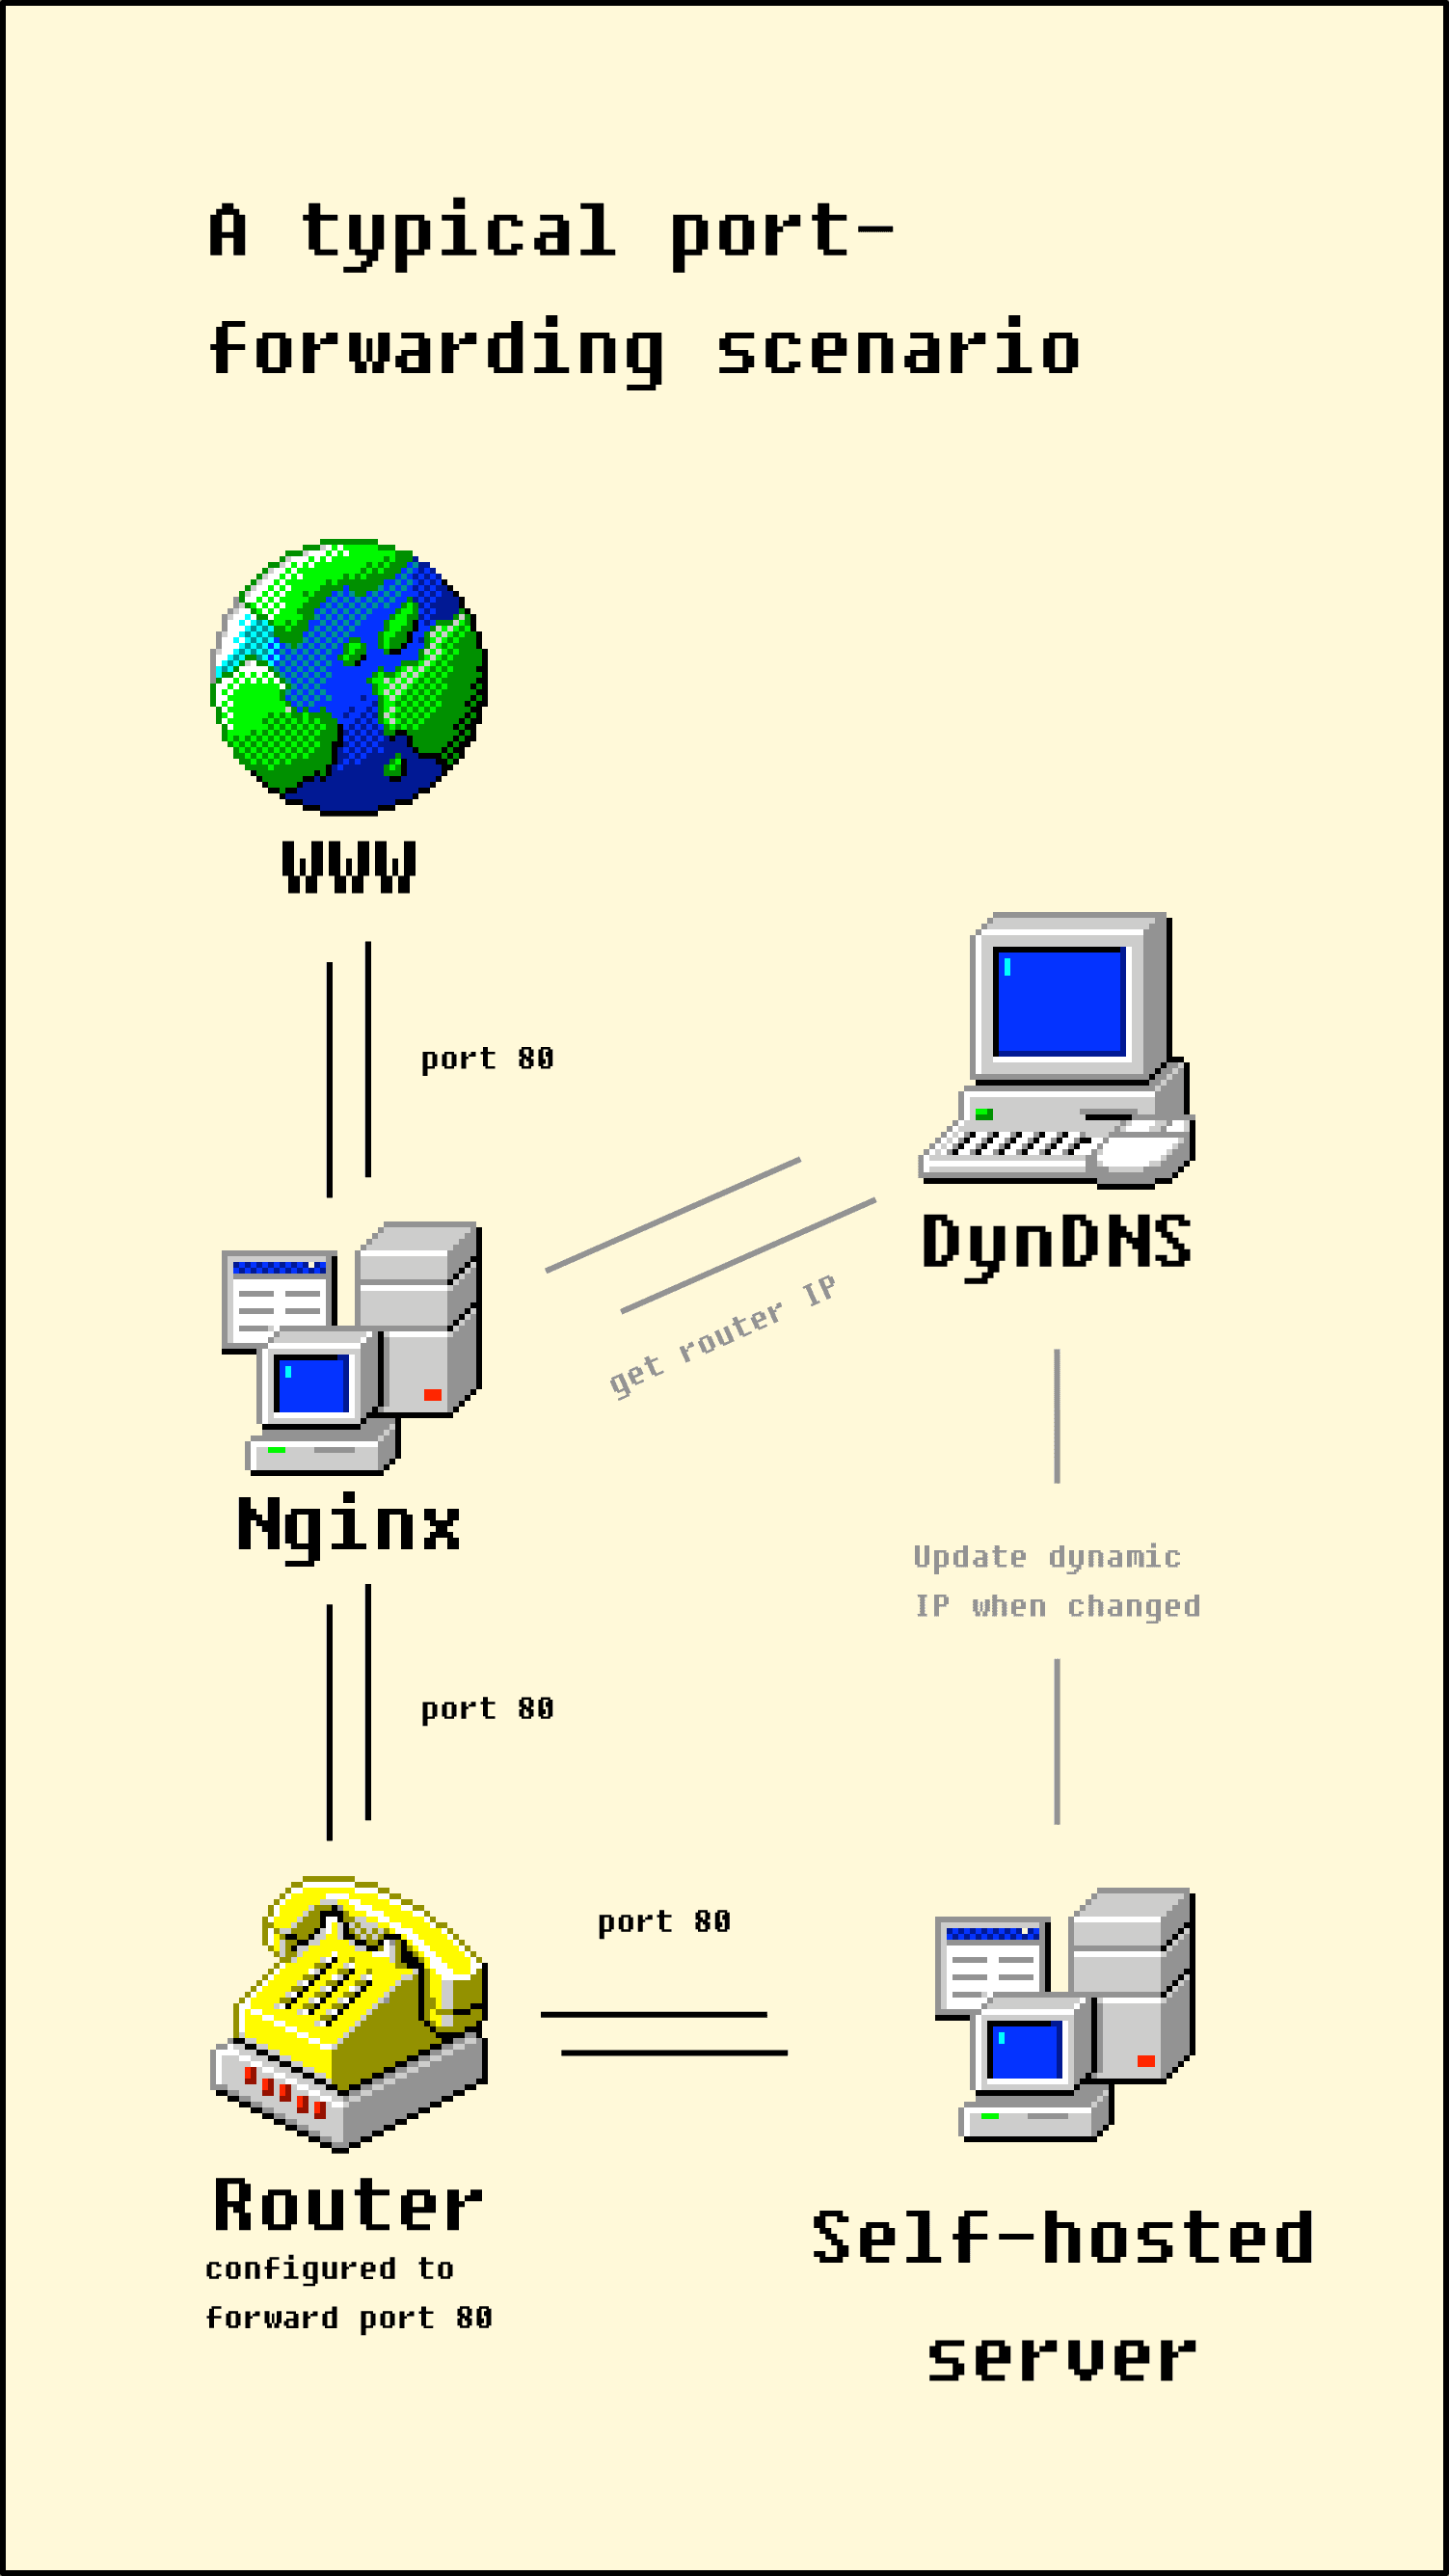
A typical port forwarding scenario opens ports on each device. When all the right ports are open, traffic flows all the way through from the internet to my self hosted server.

In my example, I have a nginx server on a cheap VPS in the cloud that handles forwarding. That VPS looks up my home IP address using a dynamic DNS service, then forwards traffic on port 80 to that IP. In turn my router is configured to forward traffic from port 80 on to the self hosted server on my network.
It works well, but that’s a lot of configuration:
- Firstly I need direct access to the ‘net from my ISP, whereas today most ISPs put you behind a carrier grade NAT by default.
- If my IP changes, there’s an outage while we wait for the DNS to update.
- If my router gets factory reset or replaced with a new one, I need to configure port forwarding again.
- Similarly, the router is in charge of assigning IPs on my LAN, so I need to ensure my self hosted server has a static IP.
A more resilient port forwarding over SSH
We can cut out all the router and dynamic DNS config by reversing the flow of traffic. Instead of opening ports to allow traffic into my network, I can configure my self-hosted server to connect out to the nginx server and open a port over SSH
You could also use a VPN, but I chose SSH because it works with zero config.

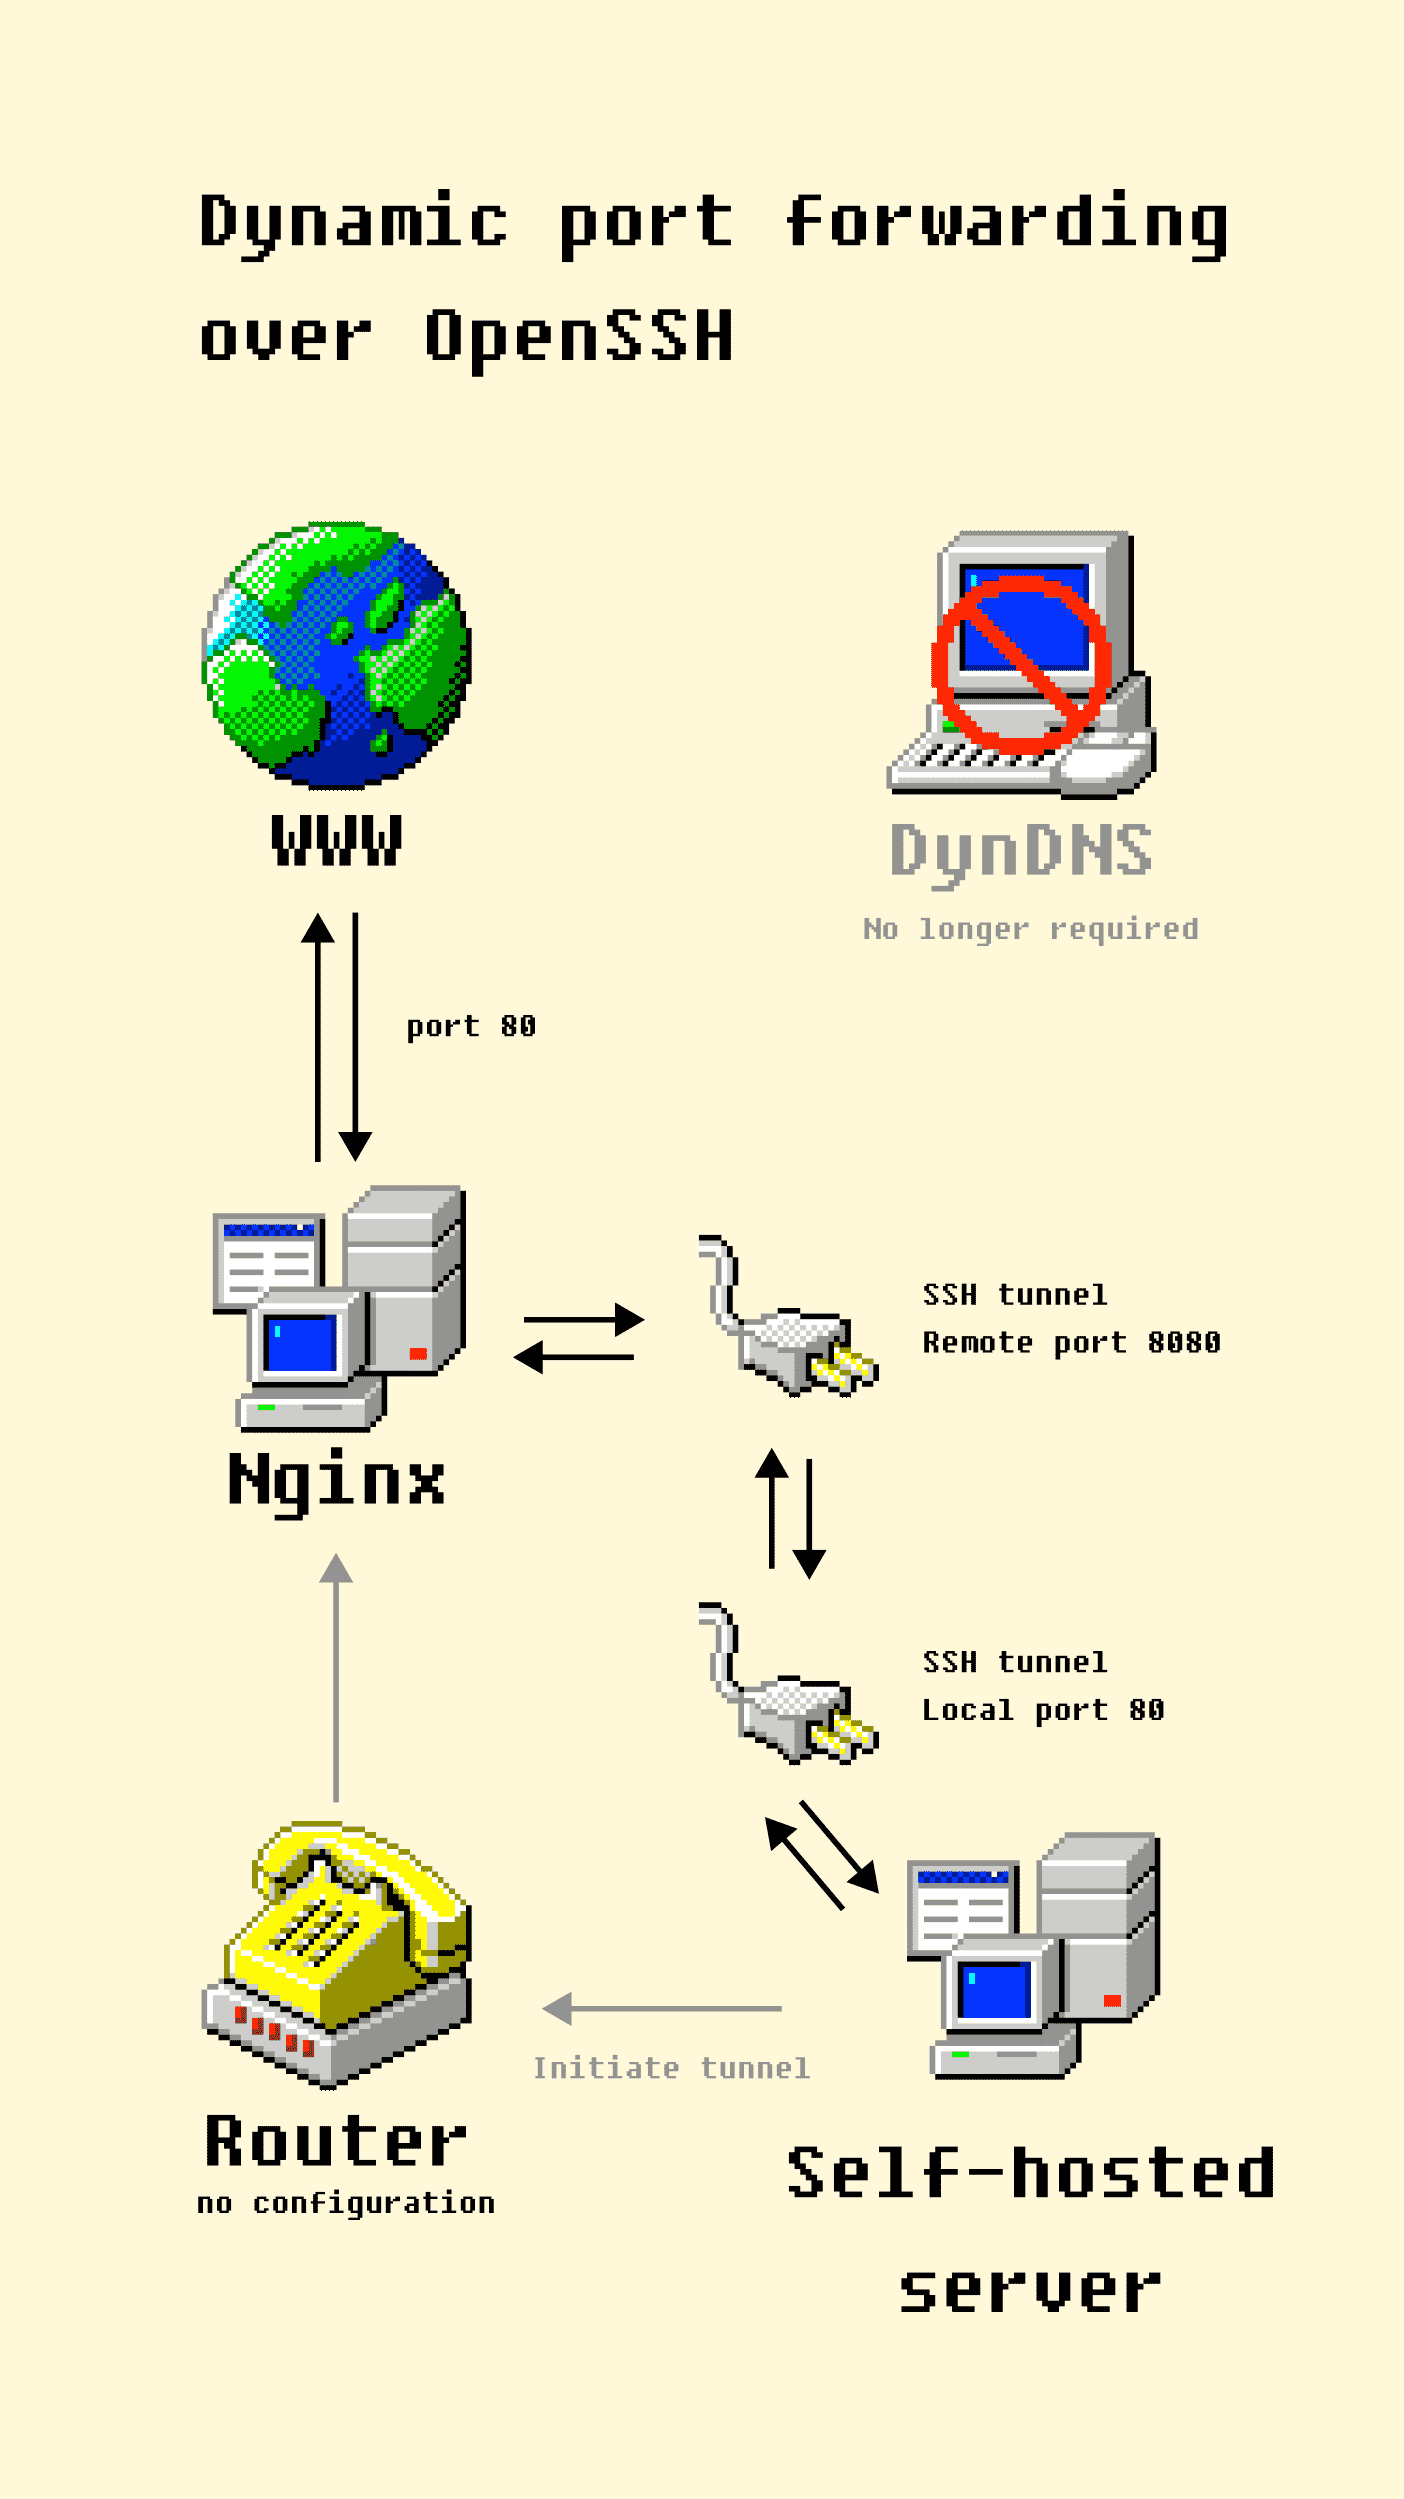
In this diagram, the self-hosted server makes a connection to the nginx server in the cloud via SSH. That ssh connection creates a tunnel that opens port 8080 on the nginx server, which forwards traffic to port 80 on the self hosted server. Nginx is then configured to forward traffic to http://localhost:8080, rather than port 80 on my router.
So the router doesn’t require any configuration, the cloud-hosted VPS server only needs to be configured once, and the dynamic dns server isn’t needed because the self-hosted server can create a direct tunnel to itself from wherever it is.
The huge benefit of this zero-config approach is I can move my self-hosted server to another network entirely and it will dial back into the nginx server and continue to work as normal.
How to set up a nginx server to forward to a self-hosted server
Putting an nginx server in front of your self-hosted stuff is a good idea because it reduces your exposure to scary internet risks slightly, and can also be used as a caching layer to cut down on bandwidth use.
In these examples, I’m forwarding traffic to localhost:8080 and 443 and will set up a SSH tunnel to forward that traffic later.
There are two ways to set up forwarding:
As a regular nginx caching proxy:
This is a good option when you want to utilise caching. However you’ll need to set up your letsencrypt certificates on the server.
server {
  server_name myserver.au
  location / {
    proxy_pass http://localhost:8080/;
    proxy_buffering off;
    proxy_set_header X-Real-IP $remote_addr;
    proxy_set_header X-Forwarded-Host $host;
    proxy_set_header X-Forwarded-Port $server_port;
  }
}
As a socket forwarding proxy
This option doesn’t proxy http traffic, it just forwards packets directly.
stream {
        server{
                listen 110.1.1.58:443;
                proxy_pass localhost:8080;

        }
        server {
                listen 110.1.1.58:80;
                proxy_pass localhost:8443;
        }
}
This method is easier for something like Coolify that deals with virtualhosts and ssl for you, but the downside is that there’s no caching, we can’t add an x-forwarded-for header, and it eats up an entire IP address. You can’t mix a socket forward with a regular proxy-pass.
How to forward ports to your self hosted server
First, generate SSH keys on your self-hosted server, and allow logins from your self hosted server to your nginx server. DigitalOcean has a guide to setting up ssh keys.
You can verify this is working by running ssh root@myNginxServer.au on your self hosted server and seeing it log in automatically without a password.
Then test your port forwarding with the following command:
ssh root@myNginxServer.au -R 8080:127.0.0.1:80 -R 8443:127.0.0.1:443The -R argument opens port 8080 on the remote server, and forwards all traffic to port 80 on the local server. I’ve included two forwards in this command, for both http and https. The 127.0.0.1 address binds traffic to localhost, so only the local machine can forward traffic on these ports, but you could open it to the whole world with 0.0.0.0.
How to set up a persistent SSH tunnel/port forward with systemd
Then, create a systemd service to maintain the tunnel.
I borrowed these instructions from Jay Ta’ala’s notes and customised them to suit:
sudo vim /etc/systemd/system/ssh-tunnel-persistent.serviceAnd paste:
[Unit]
Description=Expose local ports 80/443 on remote port 8080/8443
After=network.target

[Service]
Restart=on-failure
RestartSec=5
ExecStart=/usr/bin/ssh -NTC -o ServerAliveInterval=60 -o ExitOnForwardFailure=yes -R 8080:127.0.0.1:80 -R 8443:127.0.0.1:443 root@myNginxServer.au

[Install]
WantedBy=multi-user.target
You can then start the systemd service/ssh tunnel with:
# reload changes from disk after you edited them
sudo systemctl daemon-reload

# enable the service on system boot
sudo systemctl enable ssh-tunnel-persistent.service

# start the tunnel
sudo systemctl start ssh-tunnel-persistent.service
My observations using SSH tunneling
If all is working, those steps should now be forwarding traffic to your self hosted server.
Initially this was difficult to set up because the vagueness of the docs for whether to use -L or -R, but once it was running it seems fine.
The systemd service works well for maintaining the connection and restarting it when it drops. I can reboot my nginx proxy and see the tunnel reestablish shortly afterward. My high level understanding is that when the tunnel breaks after ServerAliveInterval=60 seconds, the ssh command will realise the connection has dropped and terminate, then systemd restarts the service ad infinitum.
You can adjust the ssh command to suit. There’s probably not much point enabling compression because the traffic is likely to already be compressed. But you could tweak the timeouts to your preference.