I’ve been thinking a lot about the problem of garbage AI generated content on the web. It’s a problem that erodes trust and makes everyone look bad. So how do you combat that?
Web buttons, of course!
I took a minute to make a colourful web button, I hope you like it.
These were popular in the early 2000s as a way of adding pieces of flair to your website, to link to friends, and to show off your W3 validated XHTML and CSS.
And given my web site is of a certain vintage I thought I’d do something up in the style.
I think it worked out really well. The little robot is very cute, and the colours were kind of inspired by the old Amiga button. And as was common at the time I exported it and closed before remembering to save my sources, so this is it now.
If you want to download and use the button on your own website, go for it. It’s all yours. Use it as you wish:
I’ve decided to upscale it here for effect, but the original version is indeed 88×31 pixels.
If you want to upscale it, you can add the css image-rendering:pixelated; to make it render pixel perfect, rather than using a more blurry modern scaling designed for photos.
I’ve been using Coolify to self-host a lot of my sites, including this one. But it’s not been without its problems.
I’ve noticed a lot of flakiness, including databases disappearing and taking down services seemingly at random. At one point I was unable to log in to any services, including Coolify itself.
Coolify uses a lot of disk space, and when you run out of space things stop working.
Coolify no space left on device, write
I noticed recently that my Ghost blog couldn’t connect to the database, and assumed it was just some general flakiness.
Then while trying to build another Node.js project I received this error:
[13:09:49.288] #8 12.84 npm ERR! code ENOSPC
[13:09:49.290] #8 12.84 npm ERR! syscall write
[13:09:49.293] #8 12.84 npm ERR! errno -28
[13:09:49.298] #8 12.84 npm ERR! nospc ENOSPC: no space left on device, write
[13:09:49.303] #8 12.84 npm ERR! nospc There appears to be insufficient space on your system to finish.
[13:09:49.306] #8 12.84 npm ERR! nospc Clear up some disk space and try again.
I had already resized the Coolify disk and filesystem up to 70gb and it was full again! What’s going on?
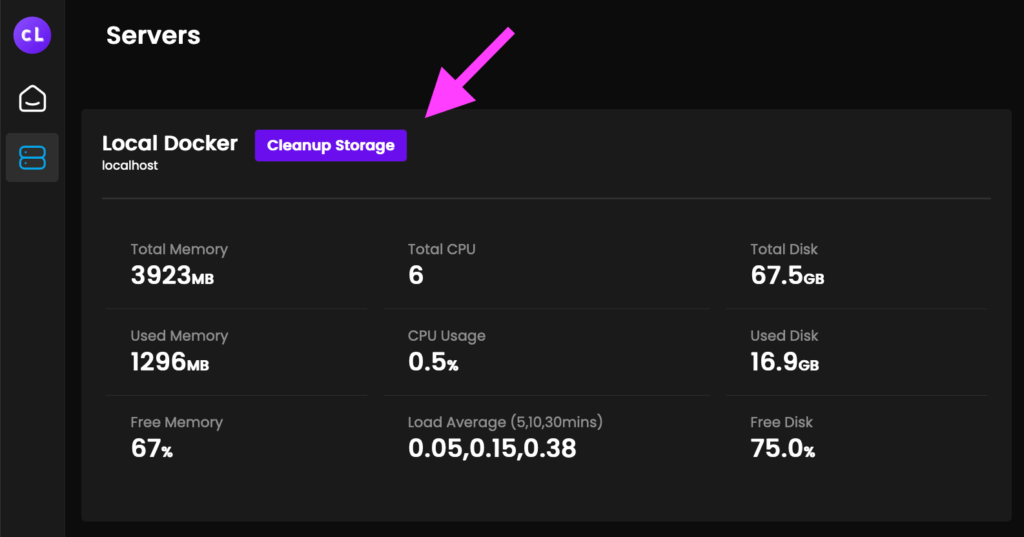
Cleanup storage in Coolify
There’s an easy way to clean up storage under Servers ➡ Cleanup Storage.
I hadn’t noticed this button before, but clicking that cleared up 50gb of storage space on my Coolify server and everything started working again.
I don’t know for certain, but I suspect under the hood this is running a docker prune operation to clean up old containers. If you’re unable to log into Coolify and you can’t resize your disk, that might be the next option.
Self hosting with NAT and port forwarding and dynamic DNS is kinda fragile. I’ve been using a very cheap cloud-hosted nginx VPS to forward traffic to my self-hosted servers and it works nicely.
But tonight I set up a ssh tunnel that punches out from my server skipping the NAT, forwarding, and DNS stuff entirely. It’ll dial home from anywhere there’s network so I could even take my server to the park and it should work over 5g.
I just think that’s neat.
I’ve tried to explain a bit of my thinking, and a loose guide for how to set this up yourself. These instructions are for someone who’s vaguely familiar with nginx and ssh.
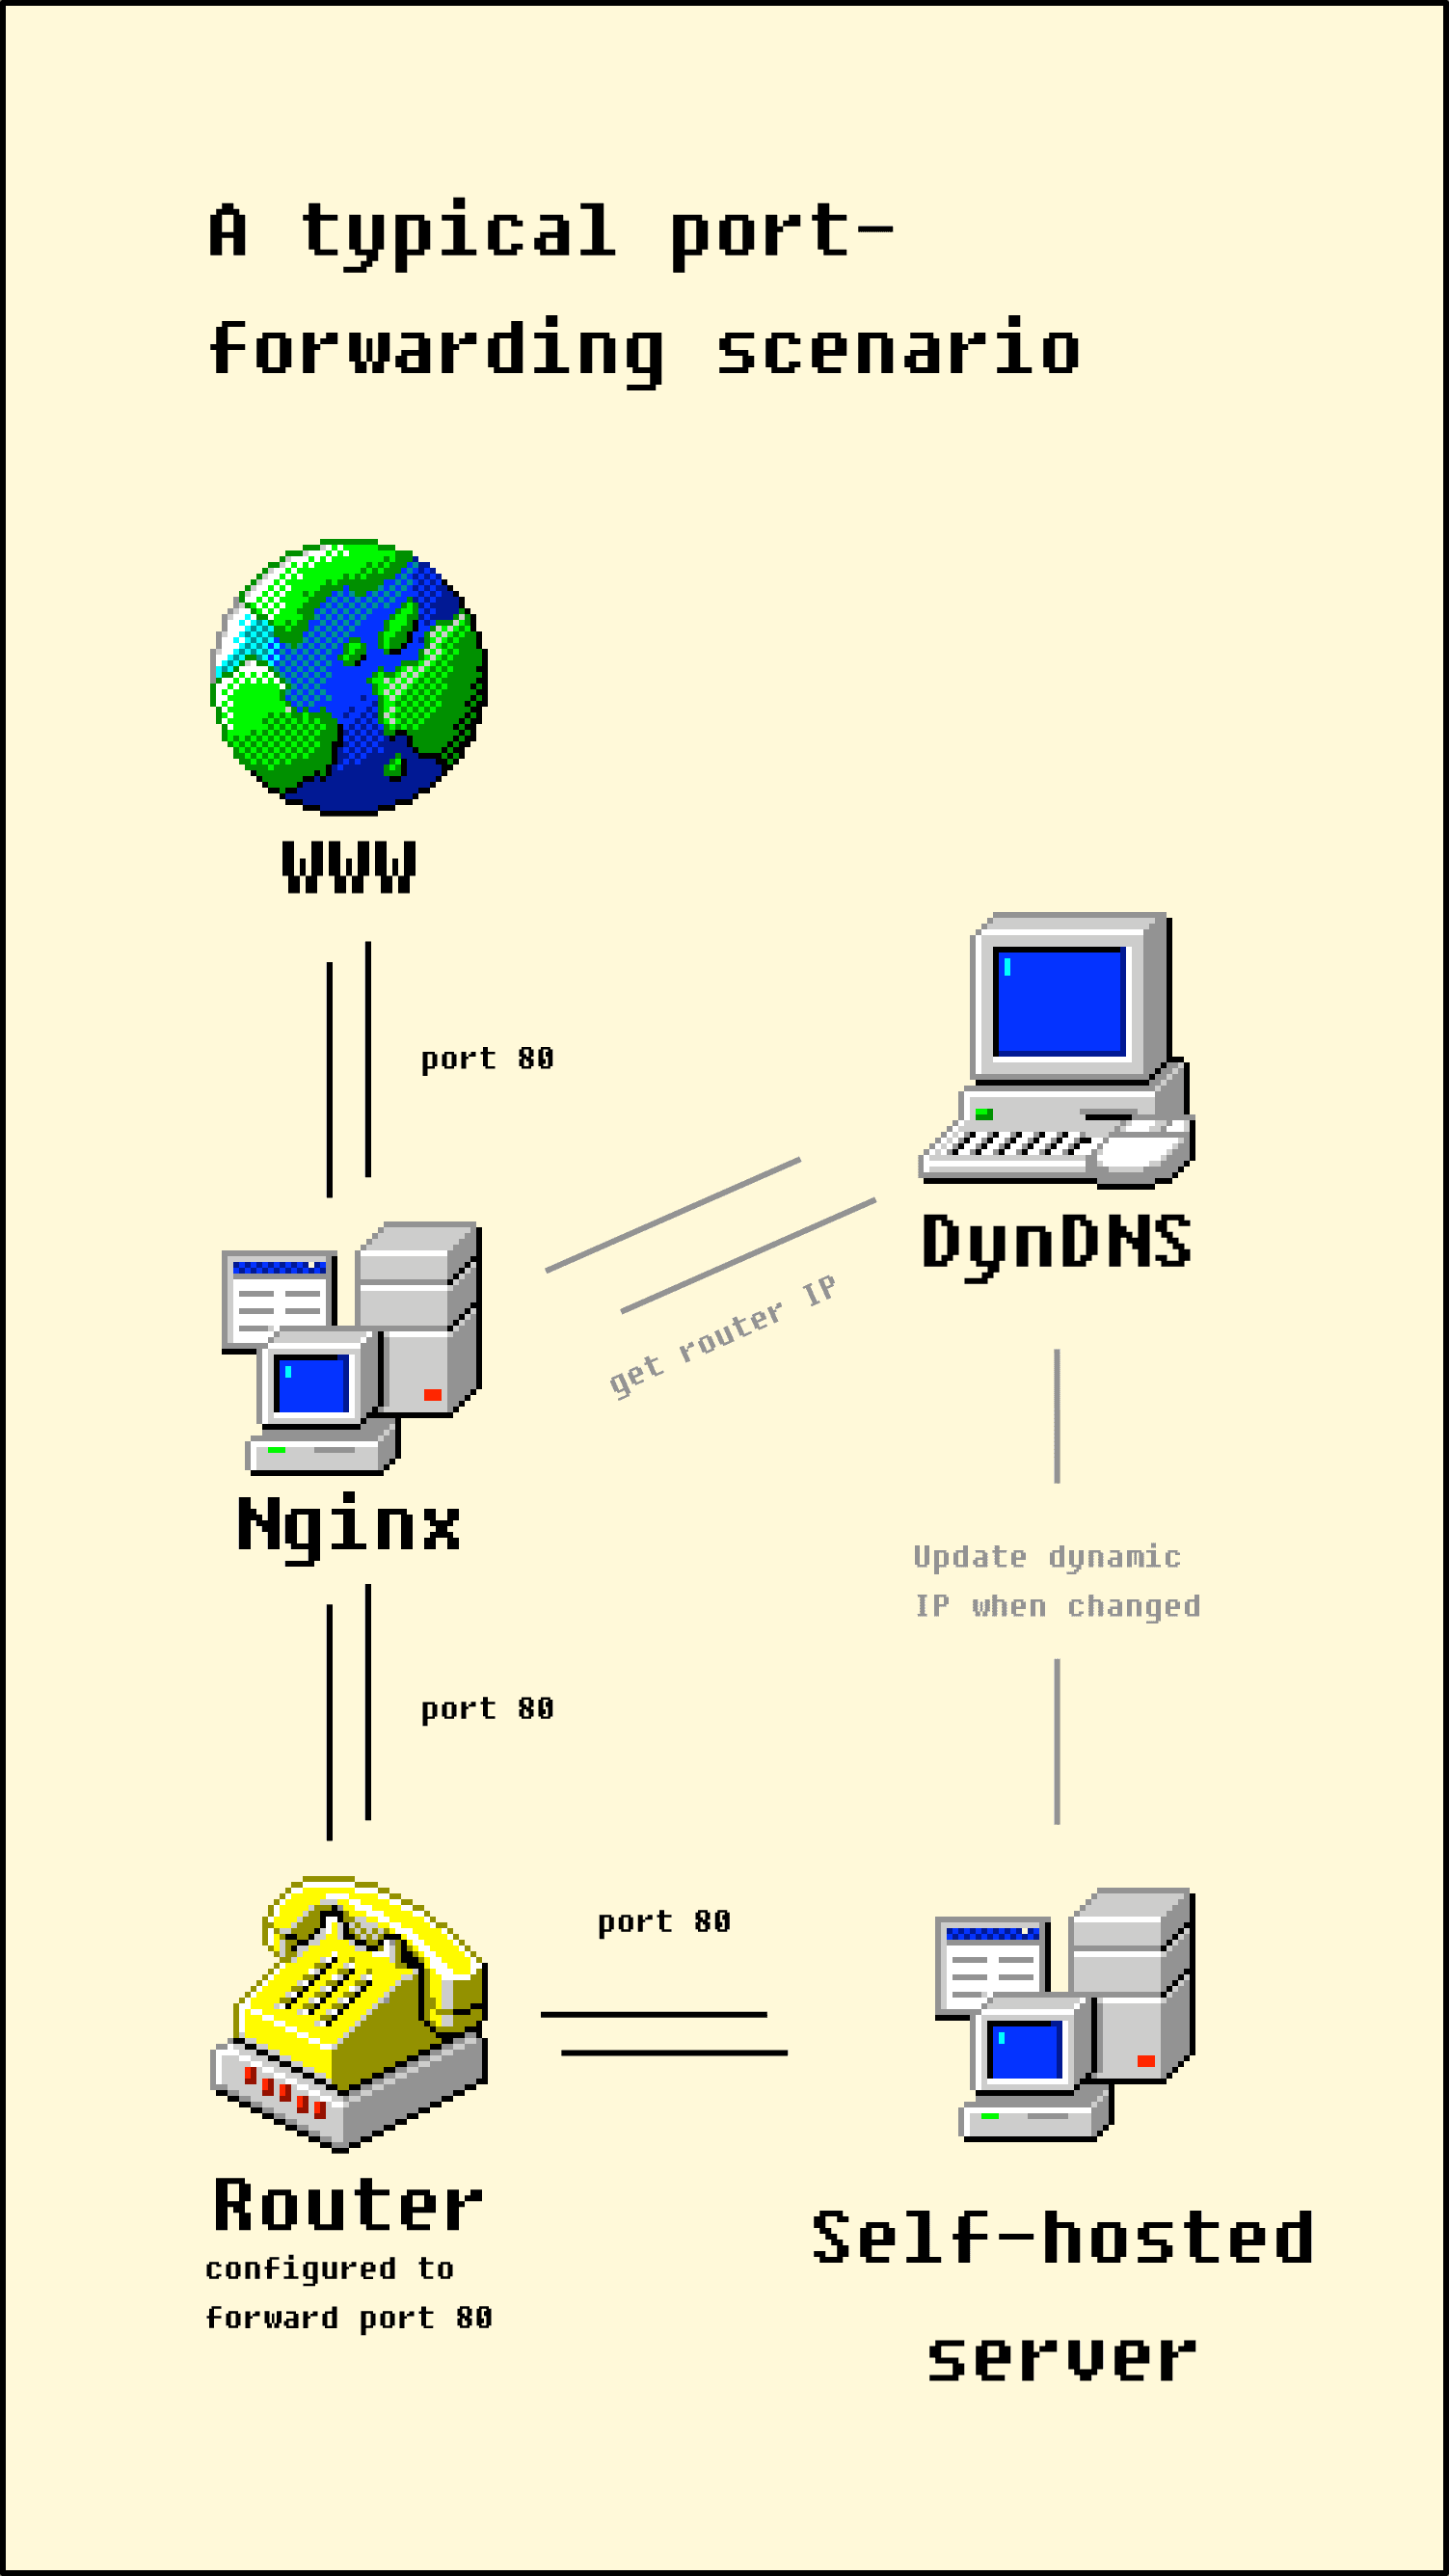
A typical port forwarding scenario opens ports on each device. When all the right ports are open, traffic flows all the way through from the internet to my self hosted server.
In my example, I have a nginx server on a cheap VPS in the cloud that handles forwarding. That VPS looks up my home IP address using a dynamic DNS service, then forwards traffic on port 80 to that IP. In turn my router is configured to forward traffic from port 80 on to the self hosted server on my network.
It works well, but that’s a lot of configuration:
Firstly I need direct access to the ‘net from my ISP, whereas today most ISPs put you behind a carrier grade NAT by default.
If my IP changes, there’s an outage while we wait for the DNS to update.
If my router gets factory reset or replaced with a new one, I need to configure port forwarding again.
Similarly, the router is in charge of assigning IPs on my LAN, so I need to ensure my self hosted server has a static IP.
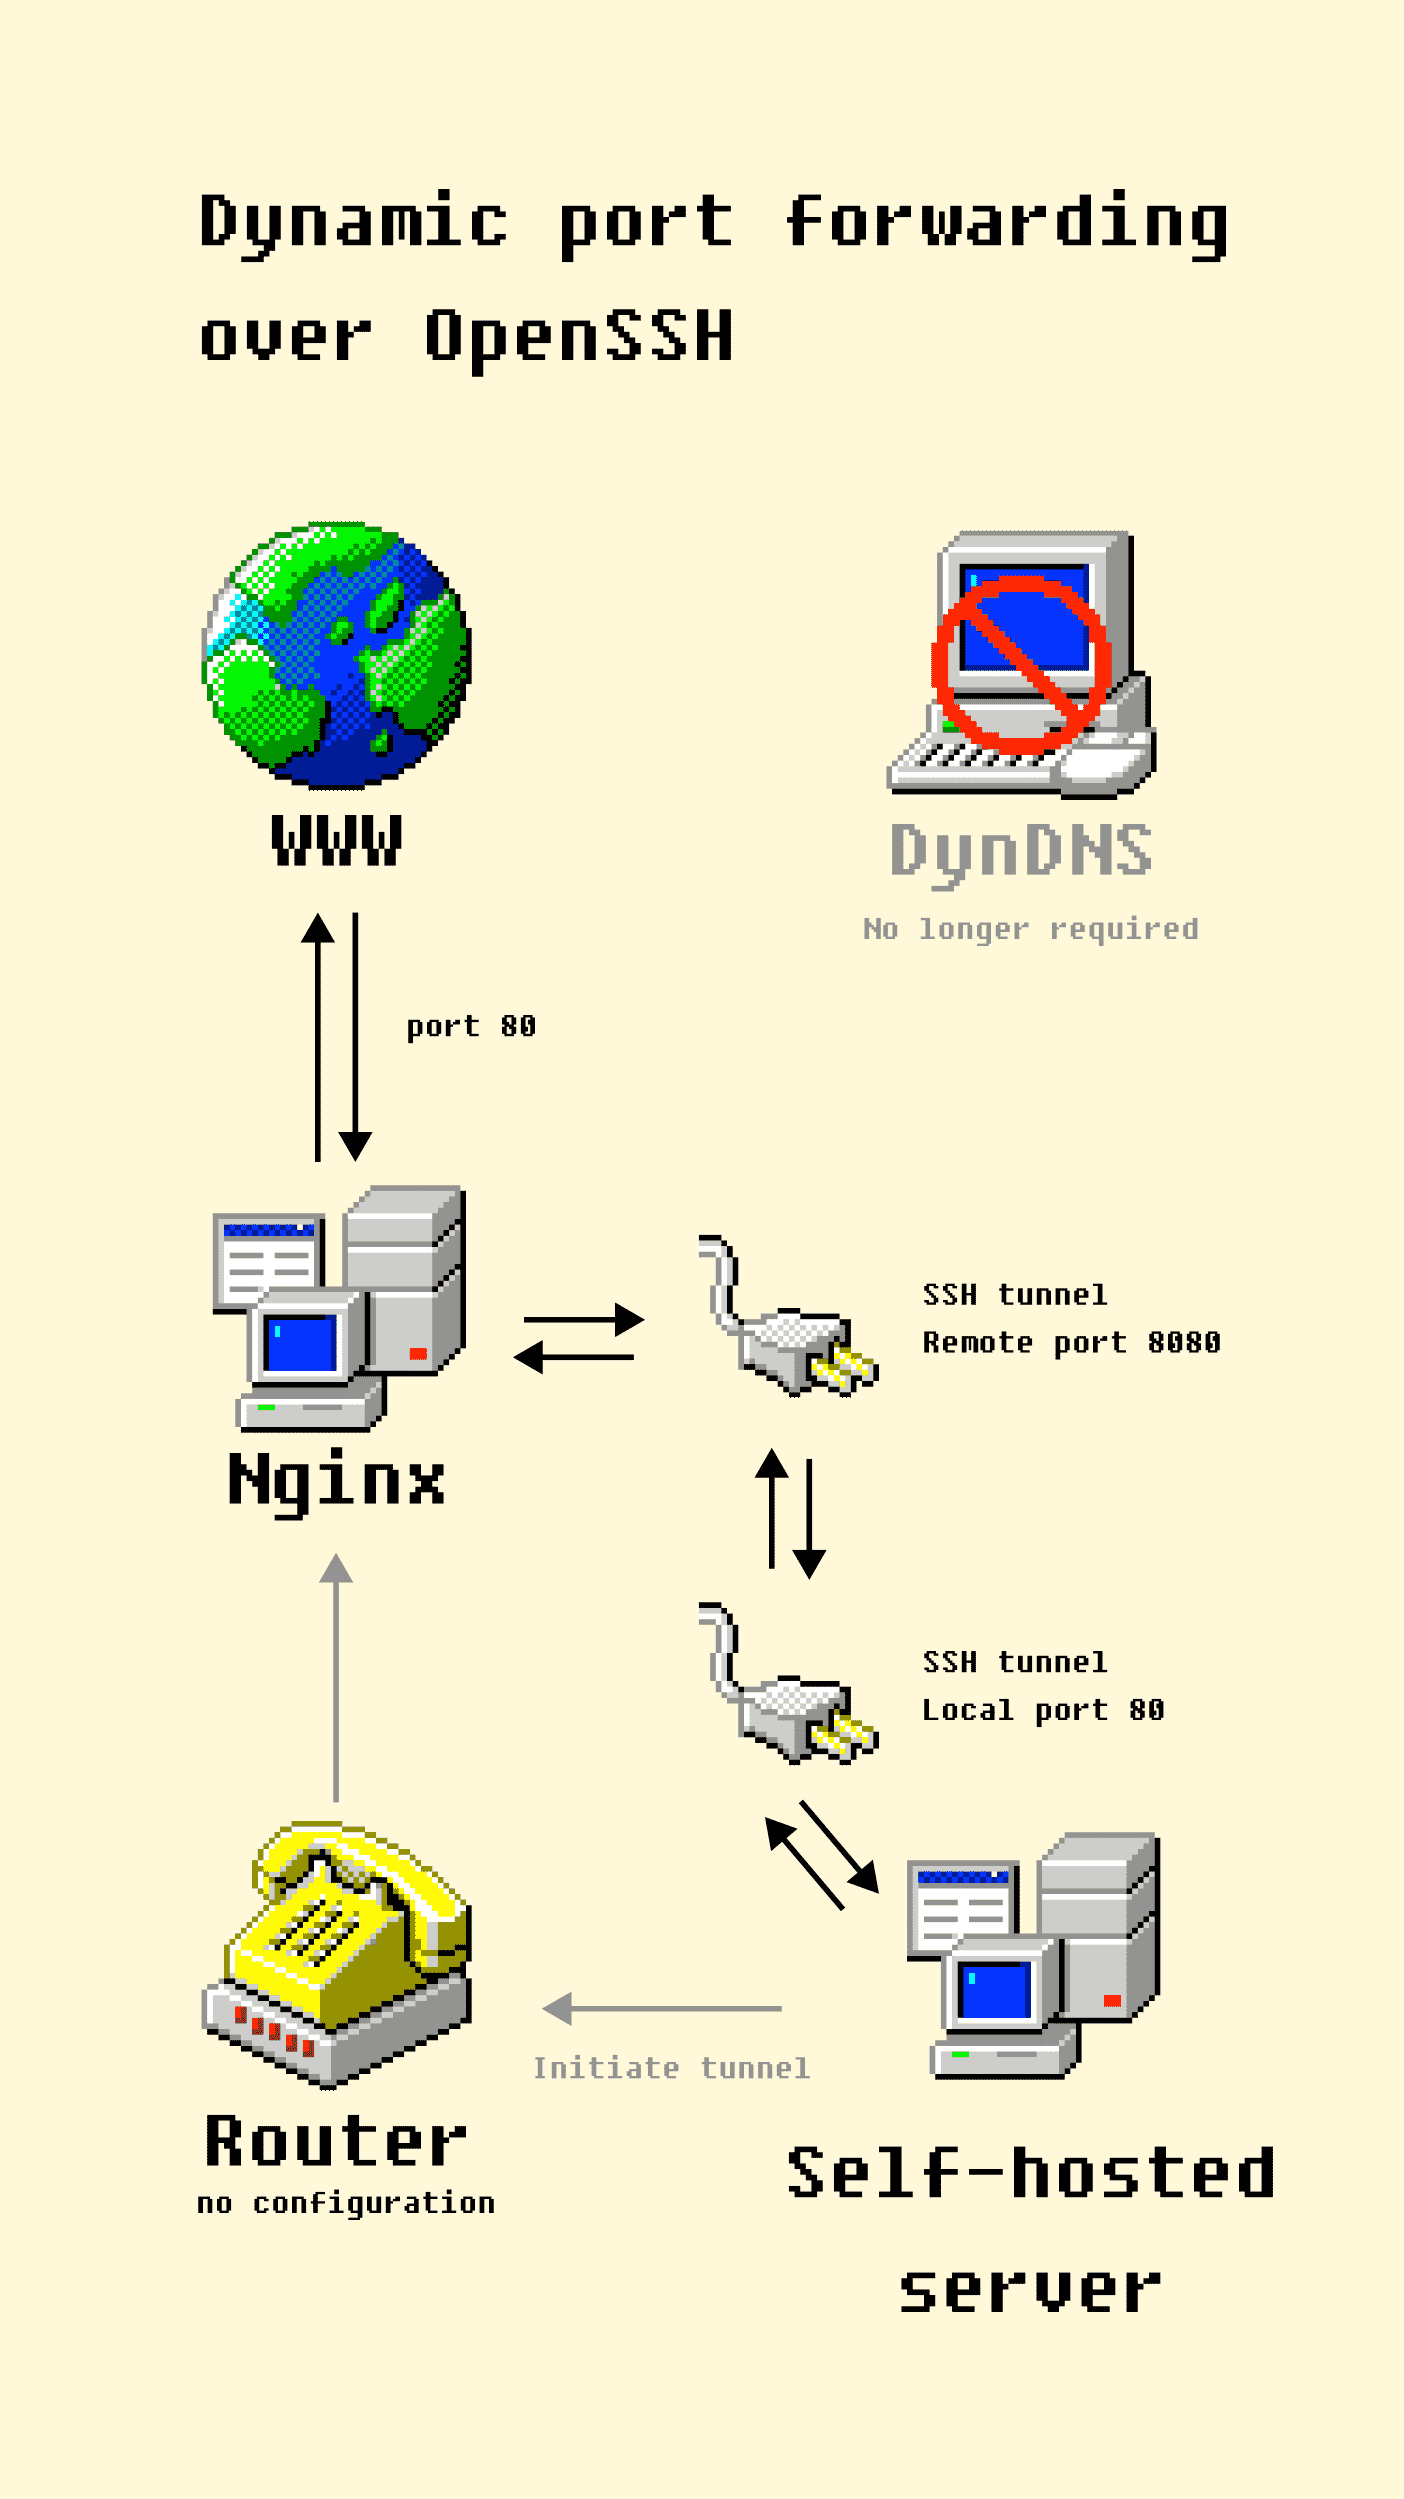
A more resilient port forwarding over SSH
We can cut out all the router and dynamic DNS config by reversing the flow of traffic. Instead of opening ports to allow traffic into my network, I can configure my self-hosted server to connect out to the nginx server and open a port over SSH
You could also use a VPN, but I chose SSH because it works with zero config.
In this diagram, the self-hosted server makes a connection to the nginx server in the cloud via SSH. That ssh connection creates a tunnel that opens port 8080 on the nginx server, which forwards traffic to port 80 on the self hosted server. Nginx is then configured to forward traffic to http://localhost:8080, rather than port 80 on my router.
So the router doesn’t require any configuration, the cloud-hosted VPS server only needs to be configured once, and the dynamic dns server isn’t needed because the self-hosted server can create a direct tunnel to itself from wherever it is.
The huge benefit of this zero-config approach is I can move my self-hosted server to another network entirely and it will dial back into the nginx server and continue to work as normal.
How to set up a nginx server to forward to a self-hosted server
Putting an nginx server in front of your self-hosted stuff is a good idea because it reduces your exposure to scary internet risks slightly, and can also be used as a caching layer to cut down on bandwidth use.
In these examples, I’m forwarding traffic to localhost:8080 and 443 and will set up a SSH tunnel to forward that traffic later.
There are two ways to set up forwarding:
As a regular nginx caching proxy:
This is a good option when you want to utilise caching. However you’ll need to set up your letsencrypt certificates on the server.
This method is easier for something like Coolify that deals with virtualhosts and ssl for you, but the downside is that there’s no caching, we can’t add an x-forwarded-for header, and it eats up an entire IP address. You can’t mix a socket forward with a regular proxy-pass.
The -R argument opens port 8080 on the remote server, and forwards all traffic to port 80 on the local server. I’ve included two forwards in this command, for both http and https. The 127.0.0.1 address binds traffic to localhost, so only the local machine can forward traffic on these ports, but you could open it to the whole world with 0.0.0.0.
How to set up a persistent SSH tunnel/port forward with systemd
Then, create a systemd service to maintain the tunnel.
sudo vim /etc/systemd/system/ssh-tunnel-persistent.service
And paste:
[Unit]
Description=Expose local ports 80/443 on remote port 8080/8443
After=network.target

[Service]
Restart=on-failure
RestartSec=5
ExecStart=/usr/bin/ssh -NTC -o ServerAliveInterval=60 -o ExitOnForwardFailure=yes -R 8080:127.0.0.1:80 -R 8443:127.0.0.1:443 root@myNginxServer.au

[Install]
WantedBy=multi-user.target
You can then start the systemd service/ssh tunnel with:
# reload changes from disk after you edited them
sudo systemctl daemon-reload

# enable the service on system boot
sudo systemctl enable ssh-tunnel-persistent.service

# start the tunnel
sudo systemctl start ssh-tunnel-persistent.service
My observations using SSH tunneling
If all is working, those steps should now be forwarding traffic to your self hosted server.
Initially this was difficult to set up because the vagueness of the docs for whether to use -L or -R, but once it was running it seems fine.
The systemd service works well for maintaining the connection and restarting it when it drops. I can reboot my nginx proxy and see the tunnel reestablish shortly afterward. My high level understanding is that when the tunnel breaks after ServerAliveInterval=60 seconds, the ssh command will realise the connection has dropped and terminate, then systemd restarts the service ad infinitum.
You can adjust the ssh command to suit. There’s probably not much point enabling compression because the traffic is likely to already be compressed. But you could tweak the timeouts to your preference.
For a while I’ve been wanting to update my website, but I’m really not a designer and I knew any attempts to improve on what I already had would be a haphazard mess.
I was looking for a new job as a React developer and really wanted to hone my skills, so I thought what better way than to build a new site in React?
As for design… why not pay homage to one of the most influential operating systems of my youth: Windows 9x. And for fun, why not make it all fit on a floppy disk.
The rise of retro nostalgia
Windows 9x is the loose name for the operating systems from Windows 95 through ME. They were pretty shoddily built on top of MS-DOS and kinda sucked. But they were revolutionary at the time, and we didn’t know better.
The design aesthetic, particularly in the Windows 98 era was something to behold.
In present day, retro tech is really making a comeback. One of my favourite examples of this is Paul Verbeek-Mast’s horrible excellent website which was kind of an inspiration for me through my design process.
But there are plenty of other amazing examples of retro nostalgia including the gorgeous poolside.fm streaming radio, and this fun game concept:
Ultimately the entire site is designed to fit on a 3.5″ floppy disk, attached to a Raspberry Pi running nginx, sitting on the shelf under my TV.
That means the entire site is 1.44 mb (or less) at any given time, and served to you straight from the ’90s.
The site is using Hexo to render out the static content, which includes a bunch of custom theming to make the data hook together nicely.
It’s also using Netlify for builds and Cloudflare as a CDN, so chances are you’ll never actually have to wait for the magnetic drive to spin up. But you never know! I get a little thrill out of that.
Update: this is back on Netlify while I’m at Fronteers Conference since I don’t have time to put the pi back together.
React & open source
This site was largely built with Preact (A fast 3kB alternative to React with the same modern API). The content is built with Hexo then progressively enhanced, so you can disable javascript (with the skip link for accessibility, or in the Start menu just for kicks) and the site still mostly works.
The interface is inspired by the more nostalgic bits of Windows 98 and ME, which were my operating system of choice in my more formative years.
If I’m honest, this was a terrible choice because the (p)react lifting state/render model is not great for large applications like this, and I led myself into an architecture that’s super inefficient and hard to maintain. But at this point I dont care, it’s working pretty well.
The UI components and some of the apps have been released on Github as a library called ui95. It’s a bit rough but you can use the library to create your own sites, apps, or just as a learning tool. Interestingly Artur Bień has been working on a parallel component library of Windows 95 styled components as well, so that’s probably worth a check-out too.
Some apps were built by third parties, including Paint and originally I was planning on including Webamp but it was too big to fit in my size budget. You can check each app for license information.
Where to from here?
Not sure. I’d like to post more on my blog and maybe find a local computer group.
But in seriousness, this was a fun project and I learned a lot putting it together. I hope you get some inspiration out of it and bring back a little of the whimsy in the retro web.