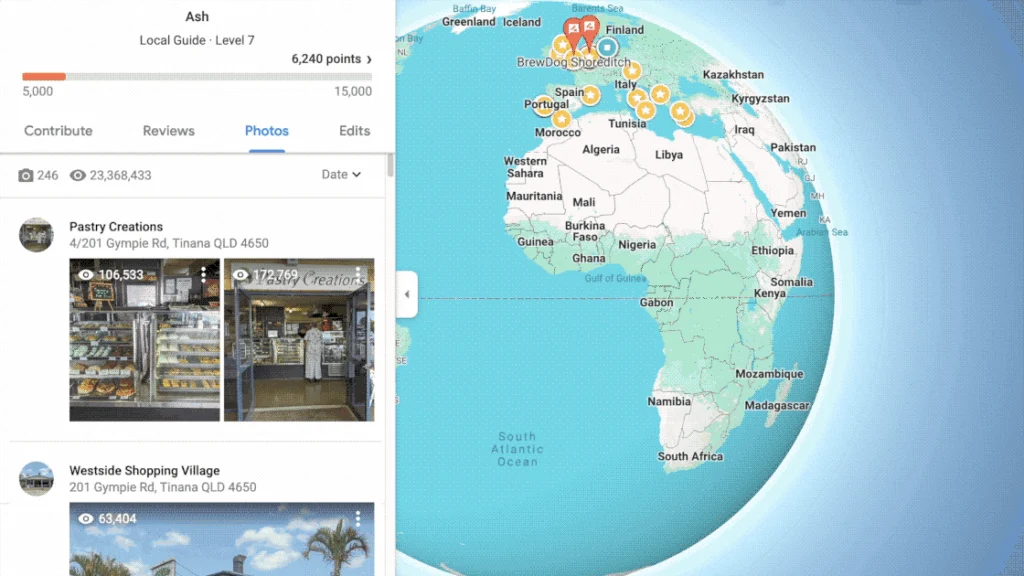
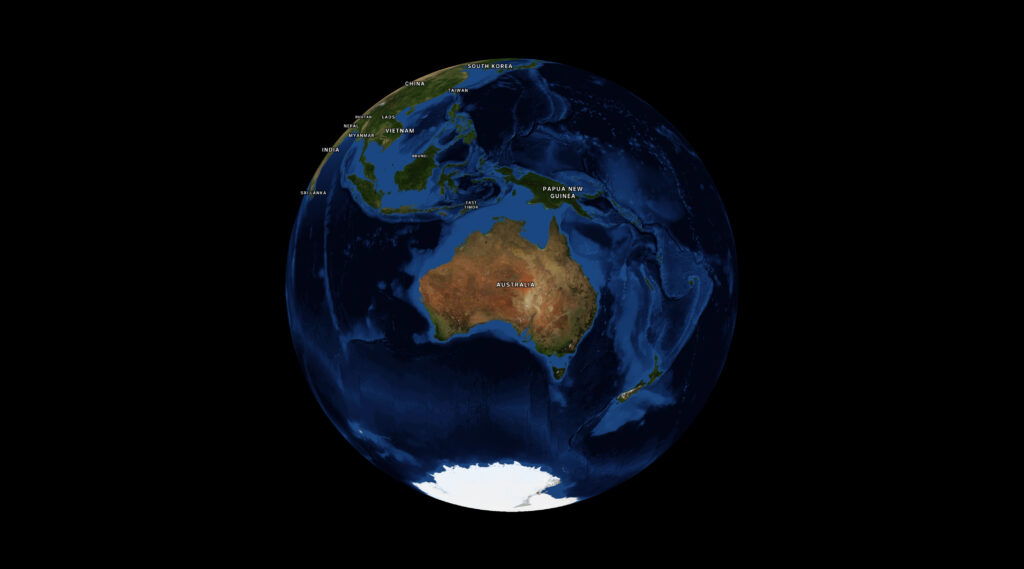
My script to auto-delete Google Maps reviews

Google Maps like much of the web has devolved into an AI generated slurry.

Nowadays every review I leave gets a reply “from” the business which is clearly generated by a machine. All the photos are inevitably going in to train Gemini. And the level-up gamification was fun at first but led to nothing more than endless grinding to reach the next level.

Anyway, I’m out. Have been for a little while. But I’ve left a trail of photos and digital detritus I’d rather clean up.

Google doesn’t have a way to bulk-delete your stuff (for obvious if annoying reasons) so I thought I’d write a little script to do it for me.

We're in Google Maps and there's an automation running to delete photos from the Local Guide section.

The scripts

There’s two scripts, one for photos and one for reviews. They’re pretty naive and need to be restarted from time to time but they should be safe enough.

Huge disclaimer: these will probably get out of date at some point and may not work. You should read and understand the code before you do anything with it.

For photos, make sure you’re on the “Photos” tab of the My Contribution section (see above), then I ran the following in the console:

(async () => {
  const sleep = (time) => new Promise(resolve => setTimeout(resolve,time));
  const go = async () => {
    // click the kebab
    document.querySelector('button[jsaction*="pane.photo.actionMenu"]:not([aria-hidden="true"])').click();
    await sleep(200);
    
    // click the delete menu item
    document.querySelector('#action-menu div[role="menuitemradio"]').click();
    await sleep(200);
    
    // click the "yes I'm sure" button
    document.querySelector('div[aria-label="Delete this photo?"] button+button,div[aria-label="Delete this video?"] button+button').click();
    await sleep(1500);
    
    // check if there's any left, and do it all again
    if(document.querySelector('button[jsaction*="pane.photo.actionMenu"]:not([aria-hidden="true"])')) go();
  }
  go();
})()

And for reviews on the reviews tab:

// delete reviews from Google Maps
(async () => {
  const sleep = (time) => new Promise(resolve => setTimeout(resolve,time));
  const go = async () => {
    // click the kebab
    document.querySelector('button[jsaction*="review.actionMenu"]:not([aria-hidden="true"])').click();
    await sleep(300);
    
    // find the delete review menu item
    const deleteMenuItem = document.querySelector('#action-menu div[role="menuitemradio"]+div');
    if(deleteMenuItem.textContent.trim() !== 'Delete review') return console.error('wrong menu item', deleteMenuItem.textContent);
    deleteMenuItem.click();
    await sleep(300);
    
    // click the "yes I'm sure" button
    document.querySelector('div[aria-label="Delete this review?"] button+button').click();
    await sleep(2000);
    
    // check if there's any left, and do it all again
    if(document.querySelector('button[jsaction*="review.actionMenu"]:not([aria-hidden="true"])')) go();
  }
  go();
})();

These are also on Github because my blog code formatting isn’t great. I should fix that up sometime.


What I learned hacking Google Maps (lol)

This code is pretty naive, and breaks a lot. I had to go back in a few times to restart the script, or adjust the timings when something broke. But it got there in the end.

I do appreciate the simplicity of the sleep() function/promiseified setTimeout. This isn’t in the language because it’s generally better to attach some kind of event or observer or do some polling to make sure the app is in the correct state. But in this case I thought it was a fairly elegant way to hack together a script in 5 minutes.

I could make this faster and more stable by implementing some kind of waitUntil(selector) function to await the presence of the menu/dialog in the DOM. But I would also need a waitUntilNot(selector) to wait for the deletion to finish. In any case that’s more complex, and we don’t need to overengineer this.

Anyway, the second script is done now and all my photos and reviews are gone. I’m still somehow a level 6 local guide (down from a level 7) so good for me.

Screenshots from Google Maps: you haven't written any reviews yet, add your photos to Google Maps + Ash is a Local Guide level 6

How I rolled my own vector map tiles

OpenStreetMap is like the Wikipedia of maps. Back in the earlier days I used to love running around gathering data and mapping every neighbourhood I could.

I reckon I contributed a pretty big portion of street names on the north side of Brissie, by riding around on my bike with my Nokia 6120c (great phone!) and a bluetooth GPS dongle, recording all the points of interest like a pro, to upload to the map when I got home.

It was a great hobby at the time, when vast swathes of Australia were completely blank. Now OpenStreetMap is pretty feature complete, it’s used everywhere.


A short history of maps as a web developer

Back in those days the state of the art for web mapping was the tile-based “Slippy Map”.

Everyone used it, even Google Maps. You’d essentially have a Javascript frontend to let visitors zoom and scroll the map like you do today. But on the server a process would convert all the OpenStreetMap geodata into standardised image tiles (raster tiles).

Tiles were commonly created at 256×256 pixels, and were rendered at zoom levels from 0 (the whole world in one tile) down to zoom level 19 where the world would take up 274.9 billion tiles.

A map of Australia and surrounding nations, split into a 256 pixel grid

This was generally an on-demand process as rendering so many tiles would be infeasible. Ridiculous. Absurd. I can tell you this because I tried a couple of times. Not for the whole world, but a few times I’d tried to scrape, render, cache the entire of Brisbane for assorted projects.


Eventually Mapbox came along with an easy-to-use interface on top of the open source data, and reasonable enough pricing to make it worth switching over.

I gave a talk a decade ago about the cool stuff people were doing with maps, and that included plenty of Mapbox evangelism.

Later Mapbox standardised the Mapbox vector tile format which had a lot of benefits over the older raster tiles.While a raster tile could be styled to look however you want on the server, a vector tile could be styled on the client-side. That meant the same tile could power a hundred different map styles, even dynamically on the client-side. In addition, vector data makes things like animating between zoom levels look great. Generally, a huge step forward.

The new OpenGL map library was released to take advantage of these benefits and it unlocked a lot of really high quality maps for the masses.

By this point high quality maps were par for the course and radical innovation in the space kind of flattened out.

My opinion of Mapbox turned when they went the way of every venture backed startup; got involved in union busting, closed-sourced their tools and started turning the money dial up. 

That’s when I started playing with maps again.


Cycling maps

Since at least 2010 I’ve maintained briscycle.com in some form or another, and always one of the main features has been maps to show safe routes and how infrastructure connects up.

I’ve gone through phases of running my own tile server, using statically rendered tiles, and third party map services including Mapbox (who can’t do very good cycling maps fyi). But recently I figured I’d go back to rendering my own.

I don’t remember where I spotted tilemaker, but it has such a sweet looking website that it inspired me to have a go at building my own vector tiles. It wasn’t as easy as the website led me to believe, but after lots of trial and error, some coding in lua to get the right properties out, I managed to get a decent looking cycling map out of it.

A map of Brisbane. It's fairly desaturated, except for the green cycleways and bike lanes everywhere.

I largely followed the instructions from Wouter van Kleunen’s how-to blog post, then:

  1. extended it by customising the lua processor to pull out more cycling attributes (and skip attributes I wasn’t interested in.
  2. styled the map using a standard json map style, but I also processed that on the client-side to add more repetitive things like road casings. You can check out the code here. (edit 2024: apparently maputnik lets you create style json in a graphical way)
  3. Set up a small Docker machine to serve mbtiles (dockerfile source)

The result is pretty cool.

It’s very fast because it’s hosted in Brisbane for a Brisbane audience, so the map tiles don’t need to transit the globe before being displayed.

The tiles themselves are optimised pretty well and allow me to tweak the styles in almost real time. There’s still a few weird bits, but I reckon it’s a good base layer to add stuff to, like geojson routes (check out the brisbane valley rail trail).

So that’s it from me. You can check out the map at briscycle.com/map or check out some of the cycling trips in Brisbane for more.

DaVinci Resolve 18 render-cached clips show “Media Offline”

Just a quick one because when I tried searching for the solution I couldn’t find it. DaVinci Resolve is my favourite professional, free video editor.

A DaVinci Resolve timeline showing a half-completed render cache over a clip of me riding a bike.

For a while though I haven’t been able to get render caching working. This weird Resolve bug would churn up my GPU, the red line above the clip would turn blue to indicate it had been render-cached, but any render cached clips were showing up as “media offline”.

Some people online mentioned this can happen if your disk is full and the files can’t be written, but I have lots of space remaining.

I tried changing the render cache directory to a custom folder to no effect. However, when I browsed to the render cache folder manually, it had no video files in it. Just a bunch of empty folders.


After some further googling, I found switching from ProRes to DNxHR HQ (High Quality [8-bit 4:2:2]) fixed it. It seems to be choking on ProRes for some reason. Some folks mentioned it was specifically ProRes 422 HQ, but I didn’t test the theory since I was in a rush.

Changing the format and hitting save was enough to trigger all my “offline” render-cache clips to rerender in the new format and start working again.

Optimised media & render cache settings. I've chosen ormat DNxHR HQ and checked all the caching boxes.

This was on an M1 mac running MacOS Ventura, using Resolve version 18.1.4. But I understand from Stack Overflow that it also happens on other v18 version as well. Given Linux and Windows don’t support ProRes I’m not sure if this tip applies there.

Hope this helps you out, traveller. If you want, chuck me a follow on Youtube. <3

Coolify out of disk space

Coolify is an open-source & self-hostable Heroku / Netlify alternative (and even more).

I’ve been using Coolify to self-host a lot of my sites, including this one. But it’s not been without its problems.

I’ve noticed a lot of flakiness, including databases disappearing and taking down services seemingly at random. At one point I was unable to log in to any services, including Coolify itself.

Coolify uses a lot of disk space, and when you run out of space things stop working.


Coolify no space left on device, write

I noticed recently that my Ghost blog couldn’t connect to the database, and assumed it was just some general flakiness.

Then while trying to build another Node.js project I received this error:

[13:09:49.288] #8 12.84 npm ERR! code ENOSPC
[13:09:49.290] #8 12.84 npm ERR! syscall write
[13:09:49.293] #8 12.84 npm ERR! errno -28
[13:09:49.298] #8 12.84 npm ERR! nospc ENOSPC: no space left on device, write
[13:09:49.303] #8 12.84 npm ERR! nospc There appears to be insufficient space on your system to finish.
[13:09:49.306] #8 12.84 npm ERR! nospc Clear up some disk space and try again.

I had already resized the Coolify disk and filesystem up to 70gb and it was full again! What’s going on?


Cleanup storage in Coolify

There’s an easy way to clean up storage under ServersCleanup Storage.

The coolify Servers panel, with an arrow pointing to the Cleanup Storage button.

I hadn’t noticed this button before, but clicking that cleared up 50gb of storage space on my Coolify server and everything started working again.

I don’t know for certain, but I suspect under the hood this is running a docker prune operation to clean up old containers. If you’re unable to log into Coolify and you can’t resize your disk, that might be the next option.

If this doesn’t help, you’ll have to search through, or ask for help on Discord.

A self hoster’s guide to port forwarding and SSH tunnels

Self hosting with NAT and port forwarding and dynamic DNS is kinda fragile. I’ve been using a very cheap cloud-hosted nginx VPS to forward traffic to my self-hosted servers and it works nicely.

But tonight I set up a ssh tunnel that punches out from my server skipping the NAT, forwarding, and DNS stuff entirely. It’ll dial home from anywhere there’s network so I could even take my server to the park and it should work over 5g.

I just think that’s neat.

I’ve tried to explain a bit of my thinking, and a loose guide for how to set this up yourself. These instructions are for someone who’s vaguely familiar with nginx and ssh.

  1. How it usually works
  2. A more resilient port forwarding over ssh
  3. How to set up an nginx proxy to forward to your self hosted server
  4. How to forward ports to your self-hosted server over SSH
  5. How to set up a persistent SSH tunnel/port forward with systemd
  6. My observations using SSH tunneling

How it usually works

A typical port forwarding scenario opens ports on each device. When all the right ports are open, traffic flows all the way through from the internet to my self hosted server.

A traditional port forwarding scenario requires dyndns to upate the dynamic IP, as well as forwarding of ports through each device until it reaches the self-hosted server.

In my example, I have a nginx server on a cheap VPS in the cloud that handles forwarding. That VPS looks up my home IP address using a dynamic DNS service, then forwards traffic on port 80 to that IP. In turn my router is configured to forward traffic from port 80 on to the self hosted server on my network.

It works well, but that’s a lot of configuration:

  1. Firstly I need direct access to the ‘net from my ISP, whereas today most ISPs put you behind a carrier grade NAT by default.
  2. If my IP changes, there’s an outage while we wait for the DNS to update.
  3. If my router gets factory reset or replaced with a new one, I need to configure port forwarding again.
  4. Similarly, the router is in charge of assigning IPs on my LAN, so I need to ensure my self hosted server has a static IP.

A more resilient port forwarding over SSH

We can cut out all the router and dynamic DNS config by reversing the flow of traffic. Instead of opening ports to allow traffic into my network, I can configure my self-hosted server to connect out to the nginx server and open a port over SSH

You could also use a VPN, but I chose SSH because it works with zero config.

A self-hosted server creates a ssh tunnel to the remote server and routes traffic that way, without DynDNS or router configuration.

In this diagram, the self-hosted server makes a connection to the nginx server in the cloud via SSH. That ssh connection creates a tunnel that opens port 8080 on the nginx server, which forwards traffic to port 80 on the self hosted server. Nginx is then configured to forward traffic to http://localhost:8080, rather than port 80 on my router.

So the router doesn’t require any configuration, the cloud-hosted VPS server only needs to be configured once, and the dynamic dns server isn’t needed because the self-hosted server can create a direct tunnel to itself from wherever it is.

The huge benefit of this zero-config approach is I can move my self-hosted server to another network entirely and it will dial back into the nginx server and continue to work as normal.


How to set up a nginx server to forward to a self-hosted server

Putting an nginx server in front of your self-hosted stuff is a good idea because it reduces your exposure to scary internet risks slightly, and can also be used as a caching layer to cut down on bandwidth use.

In these examples, I’m forwarding traffic to localhost:8080 and 443 and will set up a SSH tunnel to forward that traffic later.

There are two ways to set up forwarding:

As a regular nginx caching proxy:

This is a good option when you want to utilise caching. However you’ll need to set up your letsencrypt certificates on the server.

server {
  server_name myserver.au
  location / {
    proxy_pass http://localhost:8080/;
    proxy_buffering off;
    proxy_set_header X-Real-IP $remote_addr;
    proxy_set_header X-Forwarded-Host $host;
    proxy_set_header X-Forwarded-Port $server_port;
  }
}

As a socket forwarding proxy

This option doesn’t proxy http traffic, it just forwards packets directly.

stream {
        server{
                listen 110.1.1.58:443;
                proxy_pass localhost:8080;

        }
        server {
                listen 110.1.1.58:80;
                proxy_pass localhost:8443;
        }
}

This method is easier for something like Coolify that deals with virtualhosts and ssl for you, but the downside is that there’s no caching, we can’t add an x-forwarded-for header, and it eats up an entire IP address. You can’t mix a socket forward with a regular proxy-pass.


How to forward ports to your self hosted server

First, generate SSH keys on your self-hosted server, and allow logins from your self hosted server to your nginx server. DigitalOcean has a guide to setting up ssh keys.

You can verify this is working by running ssh root@myNginxServer.au on your self hosted server and seeing it log in automatically without a password.

Then test your port forwarding with the following command:

ssh root@myNginxServer.au -R 8080:127.0.0.1:80 -R 8443:127.0.0.1:443

The -R argument opens port 8080 on the remote server, and forwards all traffic to port 80 on the local server. I’ve included two forwards in this command, for both http and https. The 127.0.0.1 address binds traffic to localhost, so only the local machine can forward traffic on these ports, but you could open it to the whole world with 0.0.0.0.


How to set up a persistent SSH tunnel/port forward with systemd

Then, create a systemd service to maintain the tunnel.

I borrowed these instructions from Jay Ta’ala’s notes and customised them to suit:

sudo vim /etc/systemd/system/ssh-tunnel-persistent.service

And paste:

[Unit]
Description=Expose local ports 80/443 on remote port 8080/8443
After=network.target
 
[Service]
Restart=on-failure
RestartSec=5
ExecStart=/usr/bin/ssh -NTC -o ServerAliveInterval=60 -o ExitOnForwardFailure=yes -R 8080:127.0.0.1:80 -R 8443:127.0.0.1:443 root@myNginxServer.au
 
[Install]
WantedBy=multi-user.target

You can then start the systemd service/ssh tunnel with:

# reload changes from disk after you edited them
sudo systemctl daemon-reload

# enable the service on system boot
sudo systemctl enable ssh-tunnel-persistent.service 

# start the tunnel
sudo systemctl start ssh-tunnel-persistent.service

My observations using SSH tunneling

If all is working, those steps should now be forwarding traffic to your self hosted server.

Initially this was difficult to set up because the vagueness of the docs for whether to use -L or -R, but once it was running it seems fine.

The systemd service works well for maintaining the connection and restarting it when it drops. I can reboot my nginx proxy and see the tunnel reestablish shortly afterward. My high level understanding is that when the tunnel breaks after ServerAliveInterval=60 seconds, the ssh command will realise the connection has dropped and terminate, then systemd restarts the service ad infinitum.

You can adjust the ssh command to suit. There’s probably not much point enabling compression because the traffic is likely to already be compressed. But you could tweak the timeouts to your preference.

The easiest way to validate email in React

Email validation is one of those things conventional frontend wisdom says to steer clear of, because:

  1. the endless complexity in how email works and
  2. because even if an email looks valid, it might not exist on the remote server.

This is backend territory.

However.

We can hijack the browser’s built-in email validation in <input type="email"> fields to give the user a better experience.


CSS validation

At the simplest, <input type="email"> fields expose :valid and :invalid pseudo selectors.

We can change the style of our inputs when the email is invalid:

input:invalid{
  border-color: red;
}

Nice. Zero lines of Javascript. This is by far the best way to do form validation in the year ${year}.


Plain Javascript email validation

The constraints validation API exposes all of this same built-in browser validation to Javascript.

To check if your email is valid in plain JS:

const emailField = document.querySelector('.myEmailInput');
const isValid = emailField.validity ? !emailField.validity.typeMismatch : true;

This works in all the latest browsers and falls back to true in those that don’t support the API.


React email validation hook

Lol just kidding, you don’t need a hook. Check this out:

const [emailIsValid, setEmailIsValid] = useState(false);

return <input
  type="email"
  onChange={e => setEmailIsValid(e.target.validity ? !e.target.validity.typeMismatch : true)}
  />

We can use the same native JS dom API to check the validity of the field as the user types.

This is by far the fastest way to validate email in react, requires almost no code, and kicks all the responsibility back to the browser to deal with the hard problems.


More form validation

Email validation is hard, and all browsers have slightly different validation functions.

But for all the complexity of email validation, it’s best to trust the browser vendor implementation because it’s the one that’s been tested on the 4+ billion internet users out there.

For further reading, MDN has great docs for validating forms in native CSS and Javascript code.

You should also inspect the e.target.validity object for clues to what else you can validate using native browser functions.

It’s a brave new world, friends.

Isolating vlog speech using Krisp AI

On a steam train ride with my mum, she starts telling a story of the trains when she was young. So thinking quickly I whip out my phone, press record, and get her to hold it so I can actually record her voice over the background noise.

It comes out distorted to ever loving shit.

A shot of DaVinci Resolve 17, video editor, with a video and audio track

So this sucks. I have to go back to the original onboard camera mic but it’s SO loud with all the engine noise, cabin chatter, and clanking in the background. Even tweaking all the knobs, you can barely hear mum at all.

Are there any AI tools to isolate voice? I remembered I’ve been using Krisp at work to cut down on the construction noise from next door. Maybe if I run the audio through that…

So I set the sound output from my video editor to go through Krisp, plug in my recorder, and play it through. It’s tinny, it’s dropped some quieter bits, but it’s totally legible! Holy cow.

Now I’ve got an audio track of mum’s voice isolated from the carriage noise. I can mix it back together with the original to boost the voice portion and quieten down the rest. This is kinda a game changer for shitty vlog audio.

This is a pretty convoluted workflow, so it’s really only useful for emergencies like this. But I’m really happy that it managed to recover a happy little memory. And I hope one day Krisp (or someone else, I don’t mind) release either a standalone audio tool or a plugin for DaVinci Resolve.

As an aside, the Google Recorder app is officially off my christmas list. Any recommendations for a better one?

Vue & React lifecycle method comparison

🤔 This is a slightly older post. It deals with Vue 2 and React class components. This is probably not what you need if you’re building a new app today.

React and Vue both have fairly well defined lifecycle events which we can use to successfully navigate the mysteries of the virtual DOM.

So without further ado, let’s get down to the React vs Vue lifecycle events smackdown!

Vue and React fighting in an animated fashion. A caption reads "Bam!"

Vue lifecycle events visualised

The following demo logs out the Vue lifecycle events when a component mounts and updates.

It’s actually a fairly nice API in that everything is consistently named, even if not all of the events are strictly useful.

Vue lifecycle events on codepen

React lifecycle events visualised

React is actually the more esoteric of the two in terms of naming, but actually offers more powerful functionality (such as my particular favourite, shouldComponentUpdate).

Vue lifecycle events on codepen

Component mount compared

The basic workflow for a component is pre-mount → render → mount.

Vue has more events, whereas React is more Javascripty with an actual ES constructor.

ReactVueDescription
constructorbeforeCreateRoughly synonymous with each other. The constructor sets up the React class, whereas Vue handles the class creation for you.
dataSet data. Vue recursively converts these properties into getter/setters to make them “reactive”.
createdData observation, computed properties, methods, watch/event callbacks have been set up.
beforeMountRight before the mounting begins: the render function is about to be called for the first time.
getDerivedStateFromPropsInvoked right before calling the render method. It should return an object to update the state, or null to update nothing.
renderrenderThe virtual DOM is rendered and inserted into the actual DOM.
componentDidMountmountedThe component is now mounted. We can make any direct DOM manipulations at this point.

We can see from our lifecycle that the perfect time to hook into the process is once the component has been mounted (in React’s componentDidMount or Vue’s mounted event).

Component update compared

Component update generally follows a pre-update → render → updated workflow. Easy!

ReactVue 
getDerivedStateFromPropsSame as when mounting.
shouldComponentUpdateLet React know if a component’s output is not affected by the current change in state or props. We can use this to prevent React blowing away our changes.
beforeUpdateCalled when data changes, before the DOM is patched.
renderrenderThe virtual DOM is rendered and patched into the actual DOM.
getSnapshotBeforeUpdateRight before the most recently rendered output is committed to the DOM. Lets you save the previous state of the DOM for use after the component has updated.
componentDidUpdateupdatedAfter the DOM has been updated

Component unmount compared

When your component is removed from the page, sometimes you need to remove event handlers or clean up after any manual DOM manipulation.

ReactVueDescription
deactivatedWhen using Vue keep-alive, the component is removed from the page but not destroyed so that we can load it again later without the overhead of component mount.
activatedThe previously deactivated component is reactivated.
componentWillUnmountbeforeDestroyWhen a component is being removed from the DOM
destroyedThe component is completely gone.

Handling errors

This is something I’ve not looked too much into, but it’s possible to catch errors from child components and change the render accordingly.

This would be most useful for a top-level component (above the routes, maybe) to show an “Aw Snap” error message into your app and stop the error bubbling up.

ReactVueDescription
componentDidCatch
getDerivedStateFromError
errorCapturedAn error occurred in a child component.

Conclusion

Each has their own benefits, neither is objectively better or worse. Personally I prefer the Vue naming, but prefer the power of the React API.

After pulling this info together I’m really interested to try out Vue’s keep-alive for render-intensive jobs. It’s a cool feature I didn’t know existed.

I’m also excited to play with component-level error handling, especially for larger apps. It makes a lot of sense to catch errors in the framework rather than waiting for them to bubble up to the global error handler 😅

Anyway, hope this was helpful. I learned something.

My Twitter ad blocking experiment, DOM manipulation in someone else’s React app

Twitter as a platform is pretty neat. Twitter as a company… has its problems.

A while back they started showing ads into my timeline, which is something I'm really not here for. I would gladly pay a fee not to have that because I love the platform, but y'know. Corporate bullshit 🙄

So I've been taking it out on the advertisers audacious enough to target me, by blocking them. Apple? Blocked. Amazon? Blocked. Intel? You betcha you're gonna git blocked.


Despite my best efforts it got to the point where I was getting way too many ads to keep up with, so I decided to write a script to do it automatically.

TL/DR: I just want to install the ad blocker extension

There's an extension you can install to auto-block Twitter advertisers (providing you're using the mobile site). You can get this for:

Update 2019: I've taken it down because it stopped working.

Automating actions in someone else's react site 🤔

I mainly use the mobile Twitter site because it's way faster than desktop, but it's one of those sites that use post processing to munge class names. So instead of seeing nice
<div class="tweet"> HTML, you get something more akin to <div class="rn-1oszu61 rn-1efd50x rn-14skgim rn-rull8r []…]">

This makes it insanely difficult to automate the process of finding an ad and
blocking it. I'm not sure what ad blockers are doing, but this requires some
pretty specific DOM selection to get working.

There's two approaches you could take:

  1. Loop through all the <div> elements on the page until you find one with the
    text you're looking for. Eg. "promoted".
  2. Use weirdly specific selectors that get the job done, almost by chance.

Despite making fun on Twitter I chose the latter, because Twitter uses inline SVG elements, which means we can find promoted tweets by querying for the presence of certain SVG paths. It's completely absurd and I think React is criminally negligent for making this a standard practice.

Here's the two main selectors I'm using to find interface elements on Twitter mobile:

// The "promoted icon"
const adSelector =
  'path[d="M20.75 2H3.25A2.25 2.25 0 0 0 1 4.25v15.5A2.25 2.25 0 0 0 3.25 22h17.5A2.25 2.25 0 0 0 23 19.75V4.25A2.25 2.25 0 0 0 20.75 2zM17.5 13.504a.875.875 0 1 1-1.75-.001V9.967l-7.547 7.546a.875.875 0 0 1-1.238-1.238l7.547-7.547h-3.54a.876.876 0 0 1 .001-1.751h5.65c.483 0 .875.39.875.874v5.65z"]';

// The dropdown chevron
const dropdownSelector =
  'path[d="M20.207 7.043a1 1 0 0 0-1.414 0L12 13.836 5.207 7.043a1 1 0 0 0-1.414 1.414l7.5 7.5a.996.996 0 0 0 1.414 0l7.5-7.5a1 1 0 0 0 0-1.414z"]';

The remainder of the extension is fairly straightforward. Find stuff, click stuff, you know the deal. If you're interested in having a play with it yourself, you can check it out and give it some stars on Github.

Hexo, static site generator


For a while now I've been running a custom hybrid of Ghost and the static site generator I built early last year. While it was doing the job, it was a bit ugly on the backend and difficult to maintain so as a Christmas project I went looking for a replacement.

Hey Hexo!

After some cursory googling I found Hexo, which seems to satisfy all my fairly simple requirements:

  • node-based to make the most of the NPM ecosystem, and because I don't like Ruby dependencies.
  • Plain and simple, no weird tech or lock-in.

Hexo

Functionally Hexo is pretty similar to Jekyll and uses all the same terminology.

The directory layout is split between source for content and themes for layout. The latter can deal with CSS and Javascript preprocessing automatically, which I was initially cold on (small modules, yo!), but it grew on my when I realised the "hexo server" site preview tool was automatically recompiling CSS & JS as I was making changes.

It's fairly pluggable, and supports my favourite Markdown renderer Marked which does lovely things to Markdown.

Custom metadata

One of the things I'm a particular fan of with Hexo is the ability the put data (as either YAML or JSON) into the front-matter. This is awesome because it lets you make templates to do pretty much anything.

One example is my Projects page, which now consists of a paragraph of actual text, and a big glop of JSON representing each project. The template takes the JSON and renders the page as if by magic, and it's much nicer than trying to organise that stuff manually.

Hexo Homepage

Conclusion

Pretty happy with this one. I've been wanting to standardise on something decent, and this fits the bill nicely. There's a whole bunch of tools and the workflow is nice. The documentation is excellent and the process of getting from nothing to a functioning site is pretty straightforward.

I like it. If you're looking for a static site generator in the Node ecosystem, then definitely give this one a go.