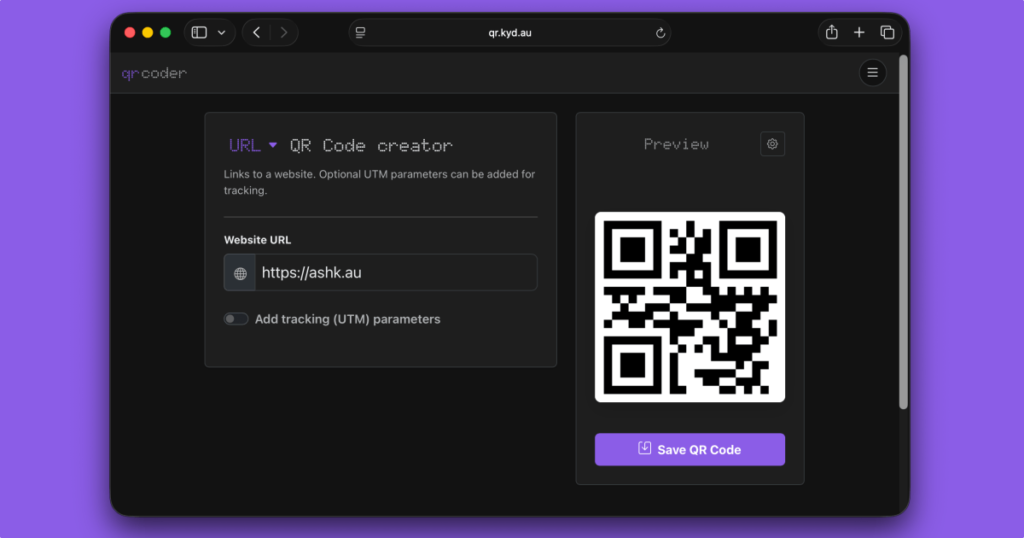
I don’t know how many times I’ve searched for a QR code creator only to land on some dodgy, slow website that’s full of ads. So I made my own.
For the longest time it was a bare basic nothingburger to get the job done. But today I spent a bit of time tweaking it, expending it, learning about Preact server rendering, adding a service worker to make it installable, and turning it into something a bit more feature complete.
I mostly use it to quickly send stuff to my phone, especially while developing.
But the new version is kind of fun because it supports a bunch of different types of QR codes, some which I didn’t even realise were possible. You can create normal things like links or contact cards, but also map locations that open in your maps app, phone numbers, calendar invites and even wifi autoconnect prompts.
This is mostly a thing to scratch an itch, but I think it’s a pretty useful tool so hopefully you will too.
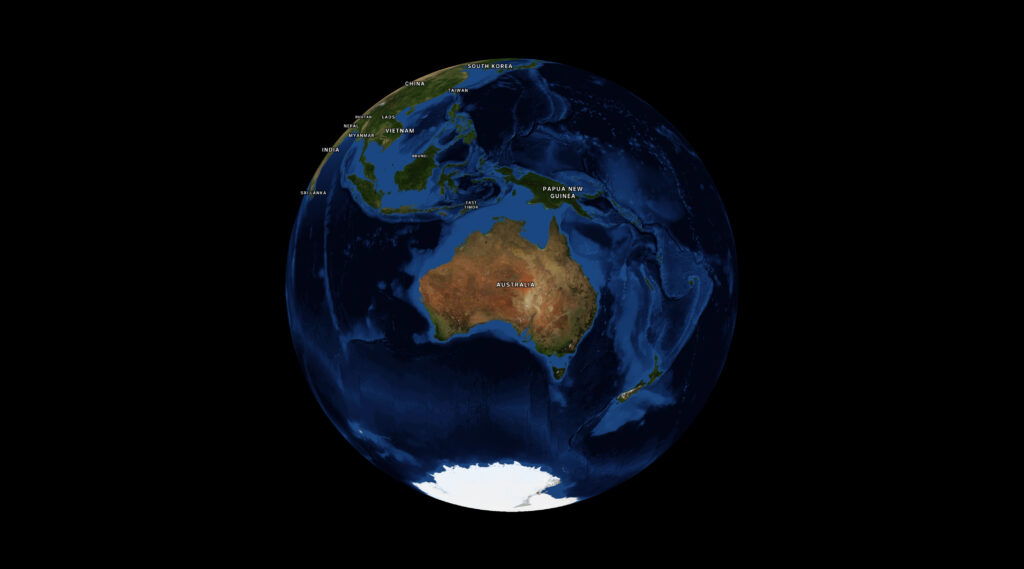
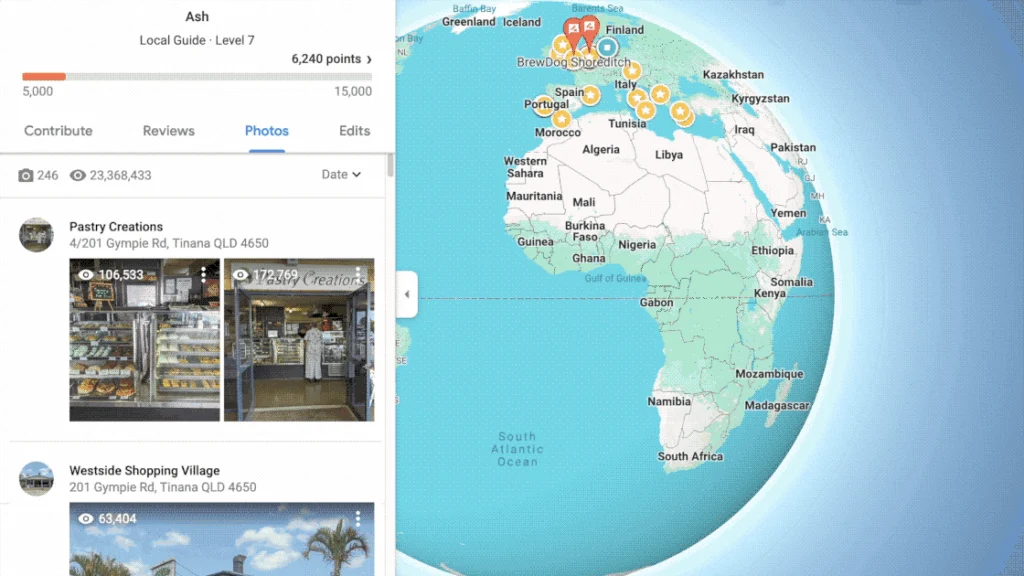
MapLibre introduced a globe mode, which is really cool. But one thing I had a lot of trouble with was making the globe take up all the available screen space without either overflowing or leaving a bunch of whitespace at the sides.
Initially I thought I could call fitBounds with the coordinates on each corner of my globe, but that only worked at latitude 0; once we started panning and zooming around the calculation would break down. This is for several reasons:
firstly, I was calculating coordinates based on the longitude, but for the latitude I’d just stuck the two poles in, figuring the top and bottom of the map would do. But the poles get visually closer together when you change the latitude. No good.
in MapLibre the zoom level (z) affects the map differently depending on your latitude. So at the poles, you need to have a super zoomed out z value to see the same amount of globe as you do at the equator. This means you have to calculate the zoom value every time the latitude changes.
This turned out to be too hard and I’d given up a few times, until I started messing around with Antigravity trying to tune my bad algorithm.
Every so often the LLM manages to do something that I would not in a million years. This is something I’ve been agonising over, and with a bit of iteration the damn thing did it with plain maths and known values:
    function fitTheGlobe() {
      if (!mapRoot.map) return;

      const container = mapRoot.map.getContainer();
      const width = container.clientWidth;
      const height = container.clientHeight;

      // 1. Determine how big (in pixels) we want the globe diameter to be on screen.
      const padding = -20; // visually tweak to fit
      const targetDiameterPx = Math.min(width, height) - padding * 2;

      // 2. MapLibre's zoom logic is based on a Mercator projection, which stretches
      // the world as you move away from the equator by a factor of 1/cos(latitude).
      // To keep the globe a constant physical size, we must shrink our target
      // dimensions by cos(latitude) to counteract that internal magnification.
      const lat = mapRoot.map.getCenter().lat;
      const latRad = (lat * Math.PI) / 180;
      const mercatorScaleCorrection = Math.cos(latRad);

      // 3. Calculate the necessary world circumference (in pixels) to achieve
      // our target diameter. On a sphere, Circumference = Diameter * PI.
      const requiredWorldCircumferencePx = targetDiameterPx * Math.PI * mercatorScaleCorrection;

      // 4. MapLibre defines Zoom 0 as a world circumference of 512px.
      // Each zoom level doubles the pixel size (exponential growth: 512 * 2^z).
      // We use Math.log2 to convert that pixel growth back into a linear zoom level 'z'.
      const targetZoom = Math.log2(requiredWorldCircumferencePx / 512);

      const currentZoom = mapRoot.map.getZoom();
      const threshold = 0.01;

      if (Math.abs(currentZoom - targetZoom) > threshold) {
        mapRoot.map.flyTo({
          zoom: targetZoom,
          duration: animationDuration,
          essential: true
        });
      }
    }
I prompted it to split the calculation out and document what’s happening and I think this is a pretty accurate take. The conditional at the end guards against rounding errors and jitter. The vibes feel good.
Look, I don’t fully understand the maths, and there’s a bit more padding the bigger your screen gets. But deeply understanding this is not necessary for me to get my work done so I’m fine with that.
Ultimately it would be nice to have a built-in function in MapLibre, and if I get a moment I’ll see if I can wrap my head around it enough to make a PR back upstream. In the meantime, I hope this helps.
Just a quick note because I found this useful and the @types/geojson docs aren’t especially verbose.
Type a GeoJSON returned from a fetch (TypeScript)
import type { FeatureCollection, Geometry } from 'geojson';

// Create a standard GeoJSON object with custom properties for each feature:
type MyFeatureCollection = FeatureCollection<
    Geometry,
    {
      // Your types go here
      name: string;
      id: string;
      height?: number;
      color?: string;
    }
  >;

// Fetch and apply types to our GeoJSON obj
const myGeoJSON = await fetch('/au.geo.json')
  .then(res => res.json() as Promise<MyFeatureCollection>);
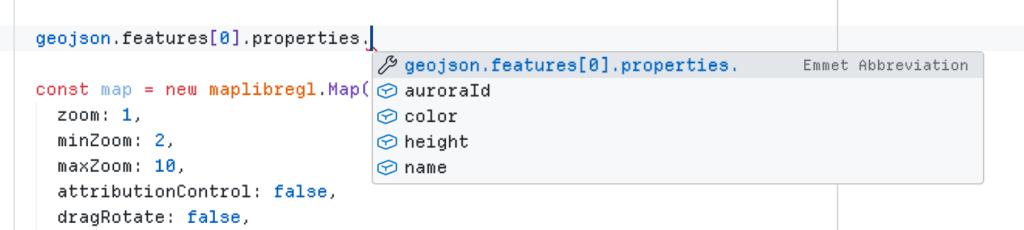
At this point you get autocomplete in VSCode Intellisense (or equivalent), for standard GeoJSON props, as well as your own custom properties. Pretty cool.
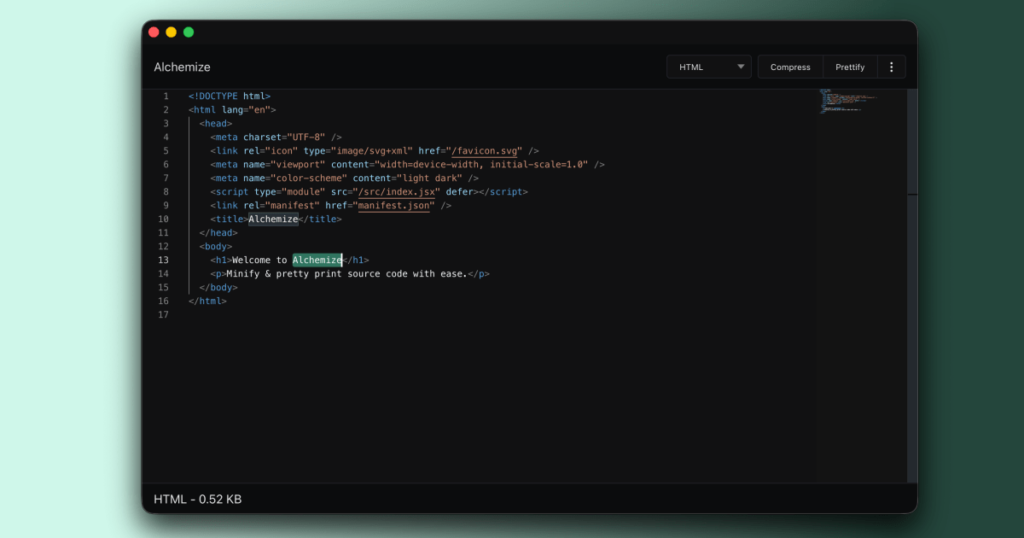
Alchemize is a lightweight tool to minify and pretty-print your code snippets from around the web. It’s perfect for developers to format messy API responses, debug broken or unreadable code, learn new JS tricks from the Terser engine, or share polished snippets with teammates.
Initially written in jQuery and after a good ten years since the last release, I thought it was time to rewrite my little code playground from scratch.
The new Alchemize is based on Preact and Vite for a more modern developer experience, uses the same editor component as VSCode, and natively supports light and dark mode. It’s been upgraded to mainly use Terser and Prettier under the hood, which brings updated JS & CSS support and should make these a lot easier to maintain going forward.
♻️ Modern tech stack A complete under-the-hood revamp for better performance and future-ready support. 🛠️ Industry-standard tooling Built on trusted technologies like Prettier and Terser for formatting and minification. ✨ Latest JavaScript and CSS support Enjoy the most up-to-date syntax features and improved styling support. 📚 Better language detection Alchemize now does a smarter job at figuring out what kind of code you’re working with.
What people said about v2
Before Google killed off Chrome apps, the app had a loyal following on the Chrome Web Store where it got a bunch of great reviews which really made my day:
“Great for checking, untangling, prettifying, and minifying JSON and other formats.”
Richard H
“Very helpful, small and effective, without the bloat of a full editor — with great error-catching capability.”
Stefan C
“I’m using this more and more now. Perfect way to make my code look nice before sharing it.”
Andrew L
🚀 Try Alchemize v3 today
The new version is live — no installation required unless you want to install it as a desktop app. Just open the app, paste your code, and experience the magic:
Pocket was a pretty great little app. It let you save articles, read them later, tag them etc. I used it because it was integrated with my Kobo ebook reader, so I could save stories and read them on that. But then Mozilla unceremoniously killed it.
I wouldn’t have minded so much except that I’m using the API to power the bookmarks section of my website. I was using it to share articles I find particularly interesting, and there’s an RSS feed for the particularly adventurous. But that’s been broken for the last little while.
I migrated over to Instapaper since that seemed to be the reliable alternative, but their API has a manual human approval process, and I’m neither patient nor confident enough that will succeed.
So I had a new idea: what if I just post to Mastodon with a specific hashtag, then use the Mastodon API to collate them all together. That way get the benefit of sharing links on socials, but it’s also much easier than having another third party app.
Long story short I gave Kilo Code some specs and it built an implementation that searches the Mastodon API for posts matching any post from me with the hashtag #link (just searches for “#link from:@ash“), then it grabs the metadata and hashtags from the API, and merges those into my existing bookmarks.json file that runs the whole thing.
I’m not going to post code because you can probably write something more to your liking. But I thought the concept was cool, and now I’m thinking about other possibilities, like having a music recommendations playlist that pulls from my posts in the #NowListening hashtag.
I saw this post on BlueSky the other day and it tickled me slightly. And I was reminded of it because in a way, that’s exactly what I’m doing now. Using loosely marked up socials as the backend.
BlueSky and YouTube are down at the same time. This is because, to save money on storage costs, BlueSky just saves all our posts as comments on one kid’s middle school science fair presentation in 2011 (he lost)
Svelte doesn’t have a built-in way to code-split components. But the new syntax brings it closer to React, so we can borrow the same pattern.
I like to have two components in this setup:
MyComponent.svelte – the main component that we want to split into its own bundle
index.svelte – the component that shows a loading spinner & renders MyComponent once it’s loaded
There may be other ways to do this but I prefer the Typescript syntax. You can adjust to suit your purposes:
import { onMount, type Component as ComponentType } from 'svelte';
let props = $props();
let Component = $state<ComponentType | null>(null);
onMount(() => {
  // import() triggers the code split, and loads async.
  // webpackChunkName tells Webpack what to name the file (where applicable)
  import('./MyComponent.svelte' /* webpackChunkName: "my-component" */).then(module => {
    Component = module.default as ComponentType;
  });
});
From there we can check in the Svelte template for Component, and render it if it exists:
When my recent project build came out at 2 megabytes for something that should have been dead simple, I realised bundling Maplibre, the webgl-based map library, was adding a lot of bulk.
Since we use maps in various projects and we don’t need to duplicate the library for each project/release I wanted to split it out onto our CDN and import it as required.
This guide is specific to MapLibre GL JS, but could apply to any large library, really.
Import the library
Maplibre isn’t an ES module, and I’m using a webpack config that won’t allow import(), so I wrote a small function to load a module as a global:
  const promises = {};
  function importModule(url) {
    if (promises[url]) {
      return promises[url];
    }
    promises[url] = new Promise((resolve, reject) => {
      const s = document.createElement('script');
      s.src = url;
      s.type = 'module';
      s.addEventListener('load', resolve);
      s.addEventListener('error', reject);
      document.head.appendChild(s);
    });
    return promises[url];
  }
From here we can load MapLibre from wherever we like. The docs suggest unpkg:
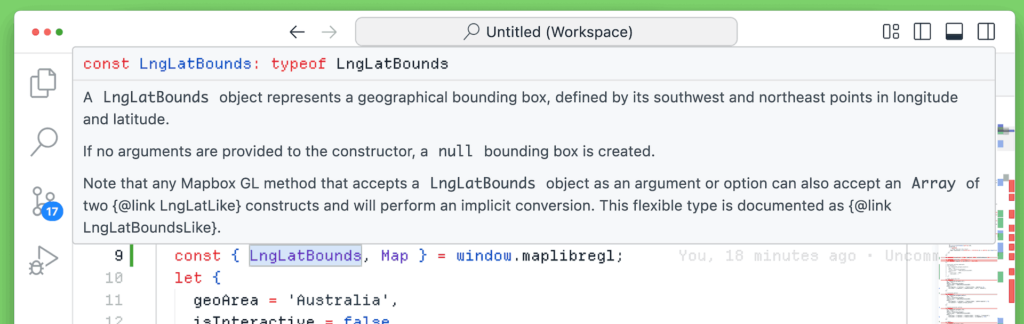
This works fine, but now Typescript has no idea what’s going on. We need to import the types.
Turns out you can plop a .d.ts file in the same directory as your code and Typescript will pick it up and provide types for the global variable.
Maplibre distributes .d.ts files in their releases, so I downloaded the release corresponding to my CDN version, unzipped the file, and placed it in the directory where I’m using maplibre. As if by magic, Typescript and JSDoc are now available:
Importing additional types
When you need specific types from the .d.ts file, you can import them as types. This seems obvious, but I got caught up with this.
import type { MapOptions } from './maplibre-gl';
const mapOptions = {
	container: mapRootEl,
	interactive: false
} as MapOptions;
map = new Map(mapOptions);
There’s two gotchas, don’t include .d.ts in the import name. Typescript will find it without, and complain with. Also make sure to import as type otherwise your build may fail.
Recently I came across the Cache API. It’s used in Service Workers to prefetch/cache files for your offline web app, but it’s also available outside of workers.
I was looking at using the Cache API to cache generated images, to speed up a WebGL piece, without crashing Safari. Never got around to it, but now I’m looking at it, it’s kinda easy:
To open a cache and save an arbitrary string:
caches.open('SomeCacheName').then(async cache => {
    // put something in the cache
    await cache.put('SomeKeyName', new Response('Hello world'));

    // Get something back out of the cache
    const response = await cache.match('SomeKeyName');
    const text = await response.text();
    console.log(text); // Hello World
});
You can then reopen that cache at any time in the future to fetch your value:
caches.open('SomeCacheName').then(async cache => {
    const response = await cache.match('SomeKeyName');

    // treat the response object as you would a fetch() response
    const text = await response.text();
    console.log(text); // Hello World
});
While this example uses strings (retrieved with response.text()), you can store any number of formats including Blobs and ArrayBuffers. See the Response constructor for ideas.
The benefit of using the standard old browser cache is that you can store a LOT of data. My Mac reports the following:
That’s 10 gigabytes of storage available. To be fair, not everyone will have that much space, but you get the idea.
It also needs to be cleaned up manually, otherwise it will sit in the cache permanently taking up space (unless the cache is cleared). The MDN page says:
The browser does its best to manage disk space, but it may delete the Cache storage for an origin. The browser will generally delete all of the data for an origin or none of the data for an origin.
I haven’t used this in production yet, but it seems to work fine. And browser support looks good. So let me know if this is useful.
Google Maps like much of the web has devolved into an AI generated slurry.
Nowadays every review I leave gets a reply “from” the business which is clearly generated by a machine. All the photos are inevitably going in to train Gemini. And the level-up gamification was fun at first but led to nothing more than endless grinding to reach the next level.
Anyway, I’m out. Have been for a little while. But I’ve left a trail of photos and digital detritus I’d rather clean up.
Google doesn’t have a way to bulk-delete your stuff (for obvious if annoying reasons) so I thought I’d write a little script to do it for me.
The scripts
There’s two scripts, one for photos and one for reviews. They’re pretty naive and need to be restarted from time to time but they should be safe enough.
Huge disclaimer: these will probably get out of date at some point and may not work. You should read and understand the code before you do anything with it.
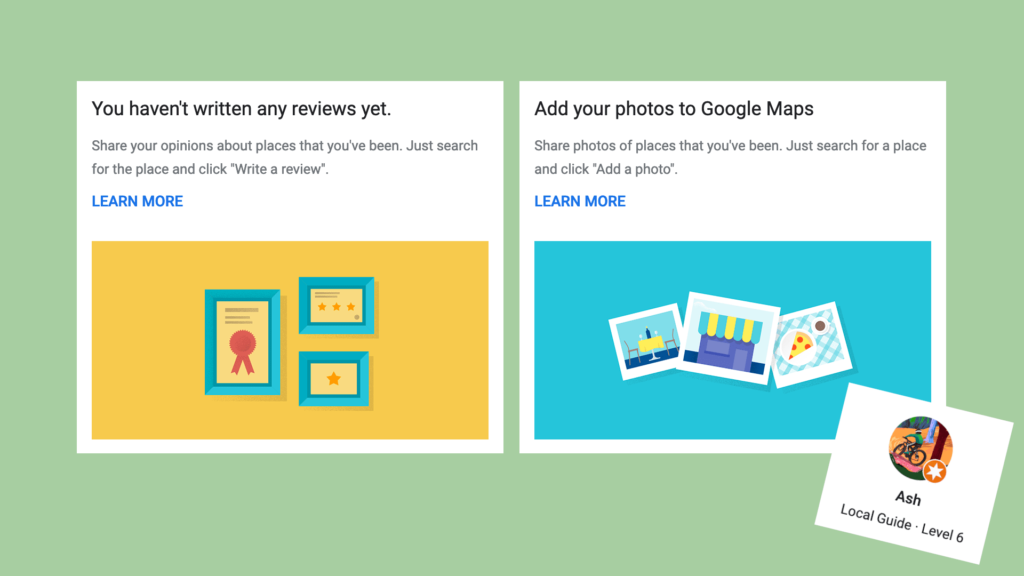
For photos, make sure you’re on the “Photos” tab of the My Contribution section (see above), then I ran the following in the console:
(async () => {
  const sleep = (time) => new Promise(resolve => setTimeout(resolve,time));
  const go = async () => {
    // click the kebab
    document.querySelector('button[jsaction*="pane.photo.actionMenu"]:not([aria-hidden="true"])').click();
    await sleep(200);

    // click the delete menu item
    document.querySelector('#action-menu div[role="menuitemradio"]').click();
    await sleep(200);

    // click the "yes I'm sure" button
    document.querySelector('div[aria-label="Delete this photo?"] button+button,div[aria-label="Delete this video?"] button+button').click();
    await sleep(1500);

    // check if there's any left, and do it all again
    if(document.querySelector('button[jsaction*="pane.photo.actionMenu"]:not([aria-hidden="true"])')) go();
  }
  go();
})()
And for reviews on the reviews tab:
// delete reviews from Google Maps
(async () => {
  const sleep = (time) => new Promise(resolve => setTimeout(resolve,time));
  const go = async () => {
    // click the kebab
    document.querySelector('button[jsaction*="review.actionMenu"]:not([aria-hidden="true"])').click();
    await sleep(300);

    // find the delete review menu item
    const deleteMenuItem = document.querySelector('#action-menu div[role="menuitemradio"]+div');
    if(deleteMenuItem.textContent.trim() !== 'Delete review') return console.error('wrong menu item', deleteMenuItem.textContent);
    deleteMenuItem.click();
    await sleep(300);

    // click the "yes I'm sure" button
    document.querySelector('div[aria-label="Delete this review?"] button+button').click();
    await sleep(2000);

    // check if there's any left, and do it all again
    if(document.querySelector('button[jsaction*="review.actionMenu"]:not([aria-hidden="true"])')) go();
  }
  go();
})();
These are also on Github because my blog code formatting isn’t great. I should fix that up sometime.
What I learned hacking Google Maps (lol)
This code is pretty naive, and breaks a lot. I had to go back in a few times to restart the script, or adjust the timings when something broke. But it got there in the end.
I do appreciate the simplicity of the sleep() function/promiseified setTimeout. This isn’t in the language because it’s generally better to attach some kind of event or observer or do some polling to make sure the app is in the correct state. But in this case I thought it was a fairly elegant way to hack together a script in 5 minutes.
I could make this faster and more stable by implementing some kind of waitUntil(selector) function to await the presence of the menu/dialog in the DOM. But I would also need a waitUntilNot(selector) to wait for the deletion to finish. In any case that’s more complex, and we don’t need to overengineer this.
Anyway, the second script is done now and all my photos and reviews are gone. I’m still somehow a level 6 local guide (down from a level 7) so good for me.
We’re releasing a WebGL feature soon, and let me tell you Safari has lived up to its reputation as the new Internet Explorer.
We’ve had two big issues:
Safari completely crashes the tab with “a problem repeatedly occurred”
Safari WebGL rendering flickers when scrolling the page
Safari completely crashes the tab with “a problem repeatedly occurred”
The most concerning issue was the Safari crash, which only happened on iOS, not the simulator. I don’t have any iOS devices to test with, so I made the decision to get myself an iPad mini. It’s a write off!
After debugging for way too long, I worked out this was a memory usage issue. Even though Safari runs on some of the most powerful mobile hardware around, it has a hard limit on how much RAM a web page can consume. Even when that page is open. So you can’t make full use of the device in Safari.
My problem had several causes:
I was loading multiple WebGL interactives on page load. Deferring these until the user scrolls them into view helped fix the issue.
I was caching WebGL textures to make the interactive feel snappier. In the end I had to remove all the caching optimisations to get under the Safari memory limit, and now each texture is rendered in realtime when it’s needed.
On top of this, I was hitting an issue with too many layers in Safari causing excessive memory usage.
Compositing layers are created when animation happens in your page. Much like old cel animated films, the browser keeps content that isn’t likely to change in separate layers so it can sandwich animated layers in between, without having to draw everything all over again. For instance a parallax effect will have a background layer and a foreground layer, moving at different speeds.
An example of animation layers drawn on old school cel sheets. The pink panther can be added and removed from the scene without redrawing the layers underneath. Via The Art Professor.
Layers in Safari are created by a number of things, including:
3d transforms – e.g. -webkit-transform: translateZ(0);
Canvas layers – canvas is designed to be drawn and redrawn at arbitrary times, so the browser keeps it on its own layer.
position:sticky/position:fixed – similar to parallax effects, these are just a part of doing business and we can’t optimise them any further
In our case, we had a number of 3d transforms and unnecessary will-change properties creating extra layers. These were contributing to Safari crashing. Cutting down on these layers stopped our page from crashing.
Safari WebGL rendering flickers when scrolling the page
This one was killing me because I couldn’t reproduce it on the iPad, and I don’t have an iPhone to test on.
This mostly seemed to happen in in-app browsers (like Slack), but this morning a colleague was able to reliably reproduce it in Safari proper, and I was able to reproduce it in the simulator.
It only seemed to happen while scrolling text boxes over the WebGL canvas So my assumption was that something was clearing the canvas without drawing the scene back in. The app is creating a separate offscreen WebGL instance for performing calculations and I assumed it might be some sort of weird race condition.
I tried a number of fixes that didn’t help:
Render every frame, regardless of whether render is needed (i.e. don’t pause rendering when the scene hasn’t changed. Based on this similar bug).
I tried enabling preserveDrawingBuffer in the renderer, because it seemed related. No dice.
Disable anti-aliasing (per this bug, where Mapbox GL and Three.js fight it out in the same WebGL context)
Downgrade to WebGL 1 (instead of 2). I can’t find the original post suggesting this, but it didn’t do anything.
The actual bug in my case was completely unrelated to Three.js.
When the screen resizes, I update the canvas size, the camera aspect, and projection matrix so that the canvas scales to fit its new dimensions:
The problem is that this code doesn’t rerender the scene. So after it’s run the frame is left blank until the next requestAnimationFrame runs.
This wasn’t a huge problem, except when the Safari chrome disappears off the page the browser triggers a whole bunch of resizes in rapid succession. These were resizing the scene, and resulted in black frames until the scene rerendered, multiple times per second. And it didn’t happen on the iPad because the chrome never disappears offscreen.
Adding a this.renderer.render() to the resize function was a somewhat inefficient but effective fix.